All it took was one nip of cold air and now all I want to do is make soup. This crowd pleaser is super simple and can be prepared several days in advance.
6-8 servings, 90 minutes
3 links or 1lb Italian sausage meat, spiced to preference
1 cup of dry lentils (or one can prepared)
1 medium to large onion
2-4 cloves of garlic
1 large can of peeled whole tomatoes (splurge for San Marzano)
4 cups (1 large box) chicken stock
Big handful of Italian parsley
4 handfuls of kale (or chard, or spinach)
Loaf of crusty bread
Sharp Italian cheese like Parmesan (splurge for pecorino Romano)
Salt and cracked black pepper
Red chili pepper flakes
Remove the sausage from its casing and toss in a large pot or Dutch oven over medium high heat with a little oil.
Dice the onion and add after the sausage has browned. Sweat the onions and stir a few times, then add chopped garlic.
After a few minutes, pour in the tomatoes and season with salt and pepper. Pour in the chicken stock and stir.
Turn the heat to high until the soup is boiling, then reduce to medium high and add the lentils. Season with more salt and pepper and let simmer for up to an hour, stirring occasionally.
Remove the biggest ribs and tear the greens into smaller chunks. Chop the parsley.
You want the liquid to reduce until it’s barely above the ingredients. Turn off the heat, add the greens in batches (it should feel like you’re adding way too much, greens reduce substantially after they’ve heated) and stir until absorbed. Taste and season until the flavors pop. Make sure the lentils are soft. Add chili pepper for a little more heat.
Warm and butter the bread. Grate the hard cheese and serve.
Slightly misogynist title. Sorry. This is Mancookgood after all. Do I get extra credit for knowing what misogyny meant before the election?
This burger is inspired by a legend from Dean Martin and Frank Sinatra. Apparently Dean was known for his burgers to the point of being asked to share his recipe. Frank, the old scamp, had to reply with his own recipe and hilarity ensued.
So, I present an alternate to my mildly offensive title.
“My Modern Take on Dean Martin’s Famous Burger”
Doesn’t roll off the tongue quite as well, does it?
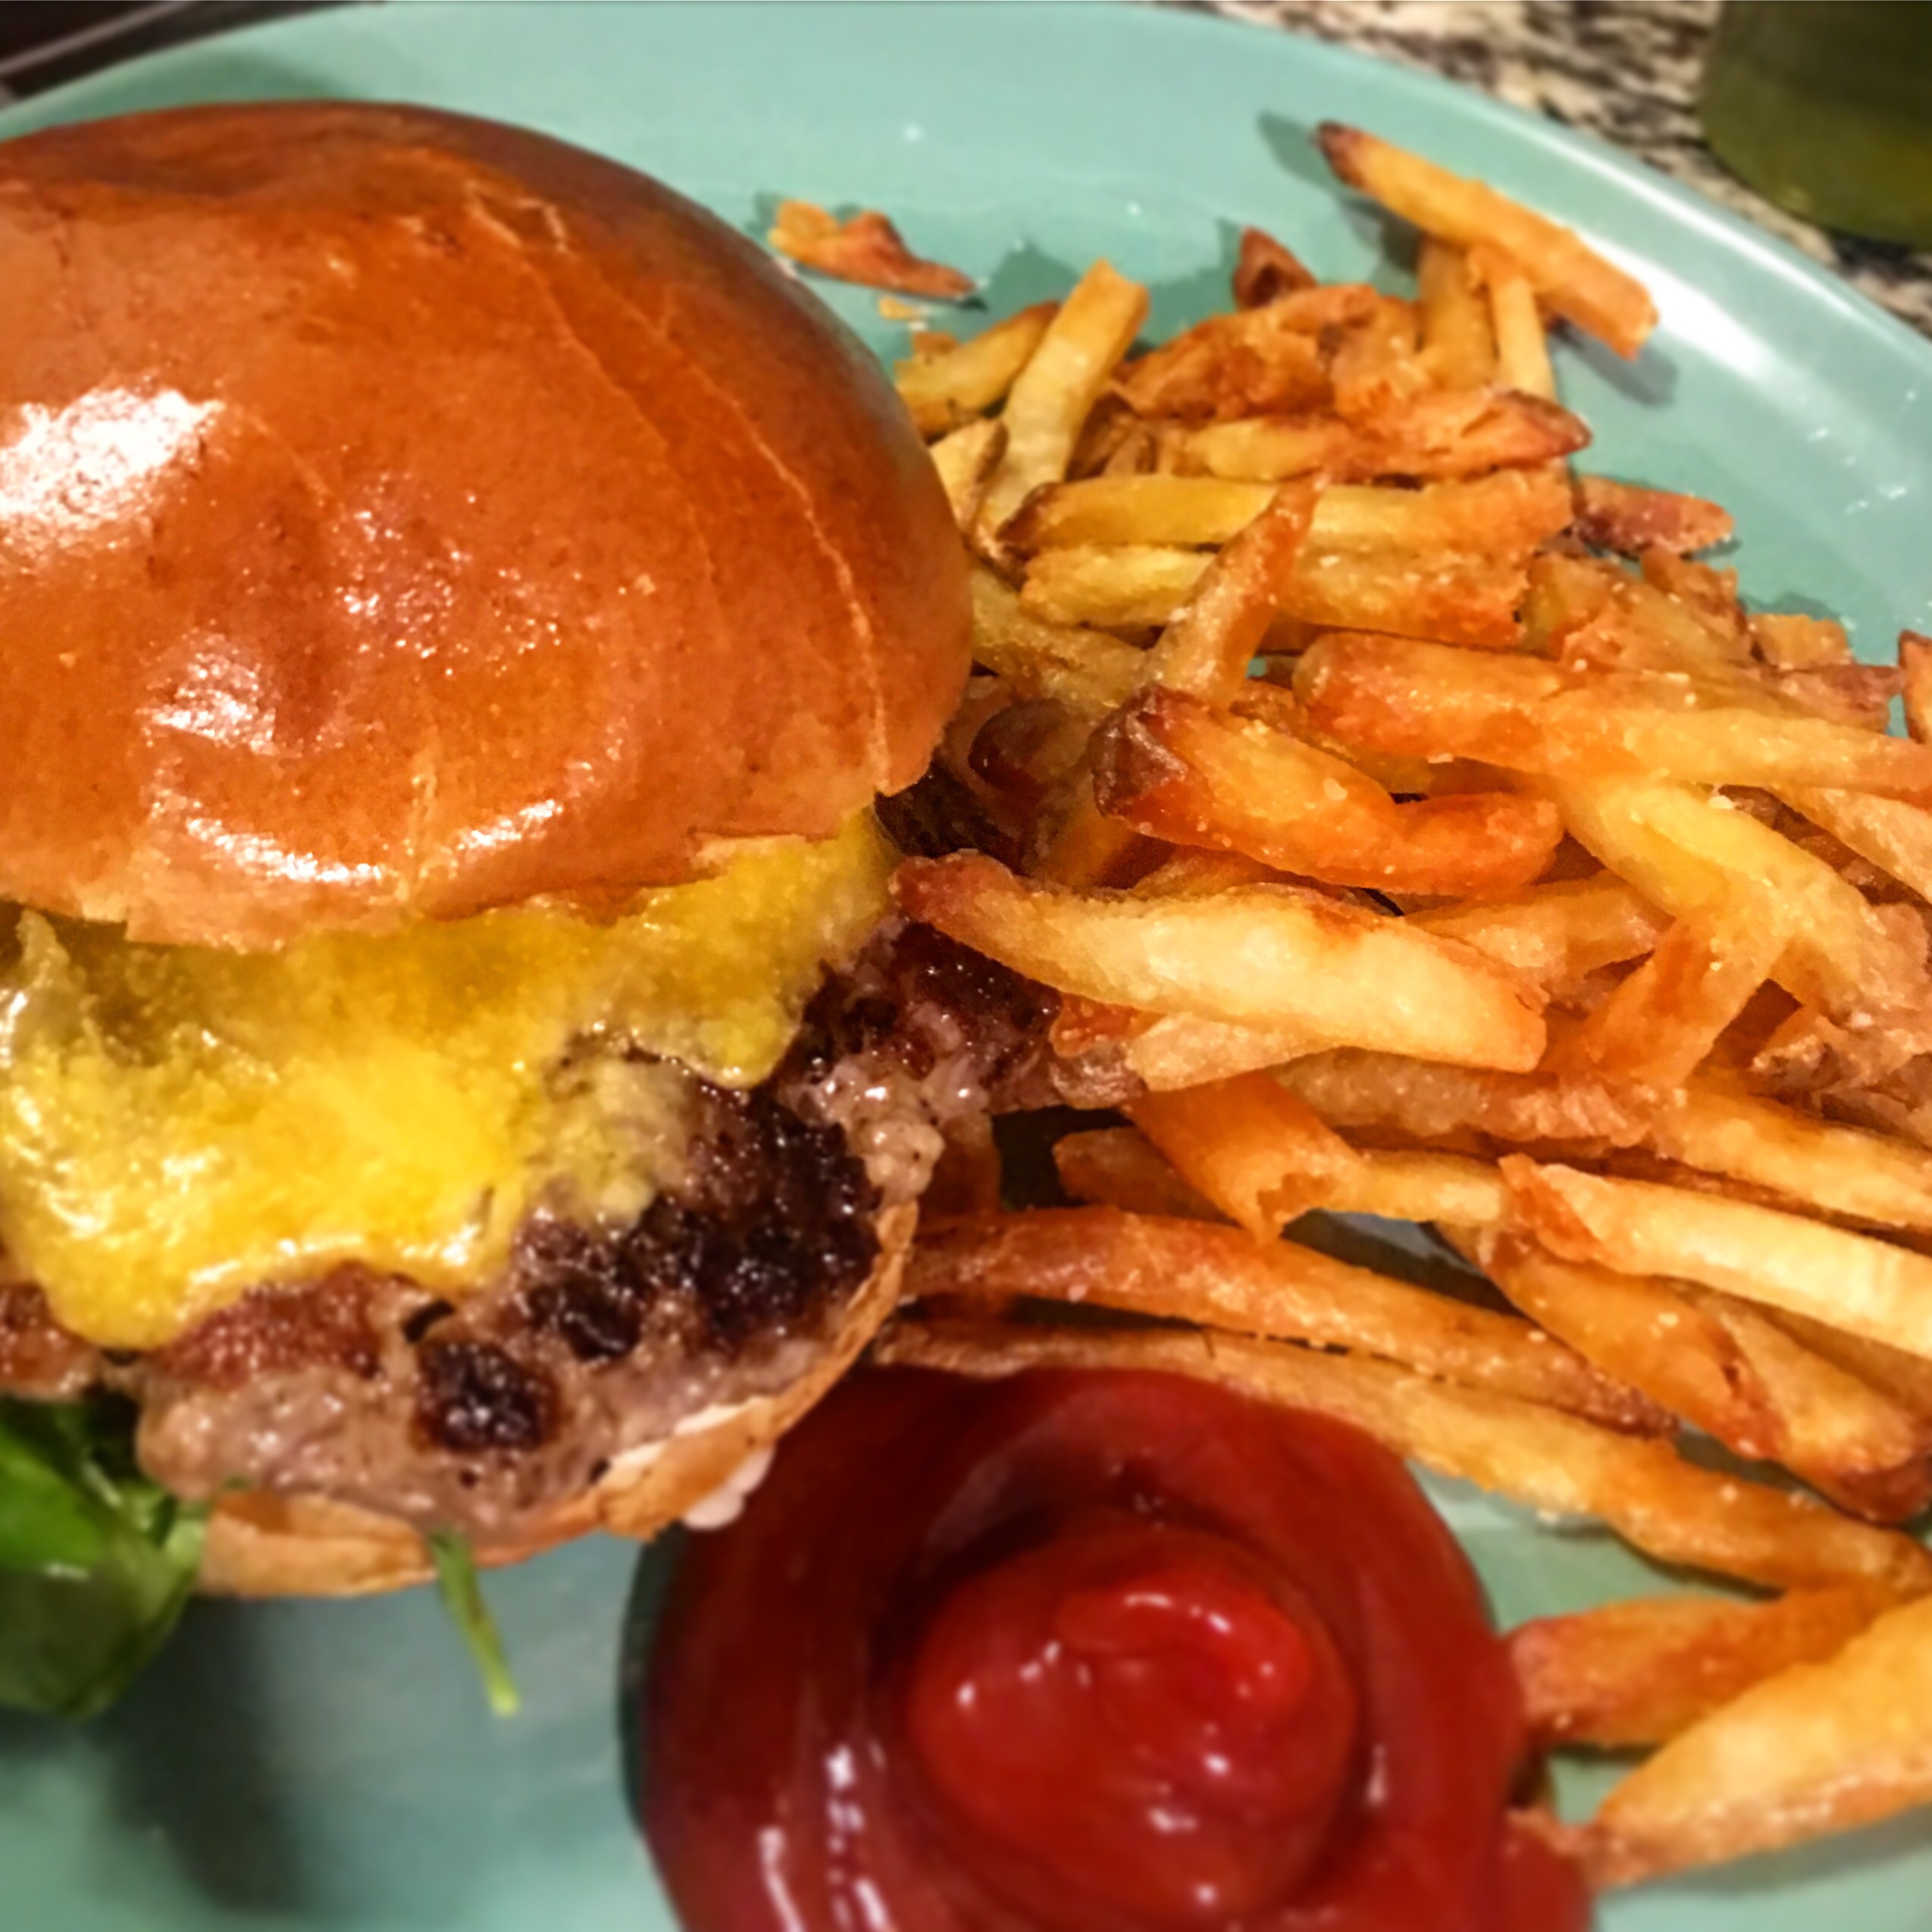
Well for most of the country grilling season is over. It’s time to heat up your cast iron skillet and make yourself a proper cheese burger.
Makes: 4 burgers
Prep time: 15-20 minutes
Ingredients:
1 cast iron or heavy skillet
3/4 lb of 85% ground beef
1/4 pound ground pork
Extra sharp cheddar cheese
Salt
Black pepper
4 hamburger buns ranging anywhere from cheap to brioche. Do not use something too bready or dense.
Optional
Tomato
Lettuce
Mayo, ketchup and mustard
1 bottle of hoppy IPA, preferably one made locally and not recently purchased by InBev
Method:
First, open the beer and take a sip.
Mix the meat just enough to combine the beef and pork. Do not over mix, it will make the meat tougher.
Turn the stovetop to medium high. Let the pan heat up while you make patties, make them relatively thin and slightly larger than your bun.
Assertively salt and pepper the patties on the up side. Place that side down into a sizzling hot skillet. Salt and pepper the up side of the patty.
Take a sip of your beer. Clean up some of your mess. (3-4 minutes)
When the down side is charred, flip the patty, place an aggressive amount of extra sharp cheddar on top of each burger and turn off the heat. Cover the pan loosely in some aluminum foil and let the cheese melt. (4-5 minutes)
Place on a bun with your favorite condiments.
If you use sliced tomato, please salt and pepper that tomato before eating.
Eat your burger. Listen to Frank and Dean while drinking your beer.
It’s cold, it’s gray and you’re bringing something to a Super Bowl party. Not only do we all want to eat better than fried buffalo wings and 7 layer dip but there has to be something out there more compelling than stuffed potato skins, right? Look no farther. This healthy and interesting dish will check all the boxes and be the star of your Super Bowl Party spread.
Protip! Bring sturdy disposable bowls to the party!
White Chicken Chili
Serves 8 Cook Time 60-90 minutes
1 pound of ground chicken
1 large white onion
2 cans of cannellini beans
2 small cans of mild green chiles
or for heat, 2 jalapenos
1 red bell pepper
2 handfuls of baby spinach or kale
1 large box (4 cups) of chicken or turkey broth
Spices
Salt
Pepper
Olive Oil
Cumin
Garlic Powder
all purpose flour (optional)
Garnish
Chopped Scallions
Cotija, Queso Fresco or Shredded Jack Cheese
2 avocado
Dice your onion and saute in hot olive oil on medium high. Add the ground chicken and cook until onions are soft and chicken is starting to brown. Break the chicken into small pieces as it cooks. Add a layer of salt, pepper, cumin and garlic powder.Sprinkle a heavy pinch of flour over the mixture here. Make sure to break it up and mix it in thoroughly.
Dice the bell pepper and add at any time. drain the cans of chiles or dice the jalapenos and add them in. If you go the jalapeno route, know that more seeds = more heat.
Drain and rinse the beans in cold water using a colander or strainer. Add once the chicken is cooked and onions are soft. Layer in some more seasoning here.
Pour the broth over the mixture and increase heat to high. Once boiling reduce heat to a simmer and cover.
Set a timer for 45 minutes and stir occasionally. You want a little broth but not as much as a soup so when the 45 minutes are up it’s time to taste and tweak. Add the greens to the simmering chili. If there is too much liquid increase heat to high and boil off some of that water content. Taste again and again until the flavor of the cumin, beans and chicken balance each other. You want the broth to balance the starchiness of the beans with the sharpness of the chilis and richness of the spice. Keep tweaking it until it sings.For last minute heat try cayenne pepper here. Add a dash, stir and taste. Repeat until you have the spice level right where you want it.
Add diced green onions, 1/4 avocado per serving and crumbled cotija cheese to finish the bowl. Toast up some homemade tortilla chips to really bring it home.
This has become my signature leftover. Last years version is still my most liked picture on Instagram. My wife talks about it all year long. It’s easy, it’s interesting and it tastes like a million bucks. If you listened to me on the Thanksgiving special podcast of the Filibuster Freestyle you’ve got that extra stuffing to go with the rest. Smart.
Ingredients
Serves 4. Cook time 15 minutes
4 spoonfuls leftover stuffing
4 spoonfuls leftover mashed potatoes
4 spoonfuls grated Parmesan
Chopped leftover turkey
2 spoonfuls of leftover gravy
1-2 eggs per person
Get a pot of water boiling on the stove. Set your eggs on the counter.
Mix the stuffing, mashed potatoes and Parmesan cheese in a large bowl. Break the filling into equal sized balls and press them between your hands to create patties.
Melt some butter in a pan on medium high heat. Cook the patties until browned on one side and flip.
At this point the water should be boiling. Gently lower the eggs in with a spoon and set a timer for 5 minutes. This will give you a little leeway with the yolks. Lower the heat to medium high.
Use a spatula to move the patties to the plate.
Toss the chopped turkey into hot butter with a scoop or two of gravy. Medium heat.
Your egg timer should go off in the middle of the hash. You’ve got about 30 seconds more until the yolk is perfectly soft. Remove from heat, pour most of the water out and fill the pan with cold water from the sink. This will stop the cook and make them easier to handle.
Using a spoon, crack the shell of the egg near the top. Work the spoon under the shell between the membrane and the white. Carefully slide the spoon around the egg, removing the shell as you go.
Finish up the turkey hash and place the finished egg on top. Salt and pepper the egg.
Leftovers like a boss. Email me pictures A mancookgood@gmail.com or tag me on Instagram!
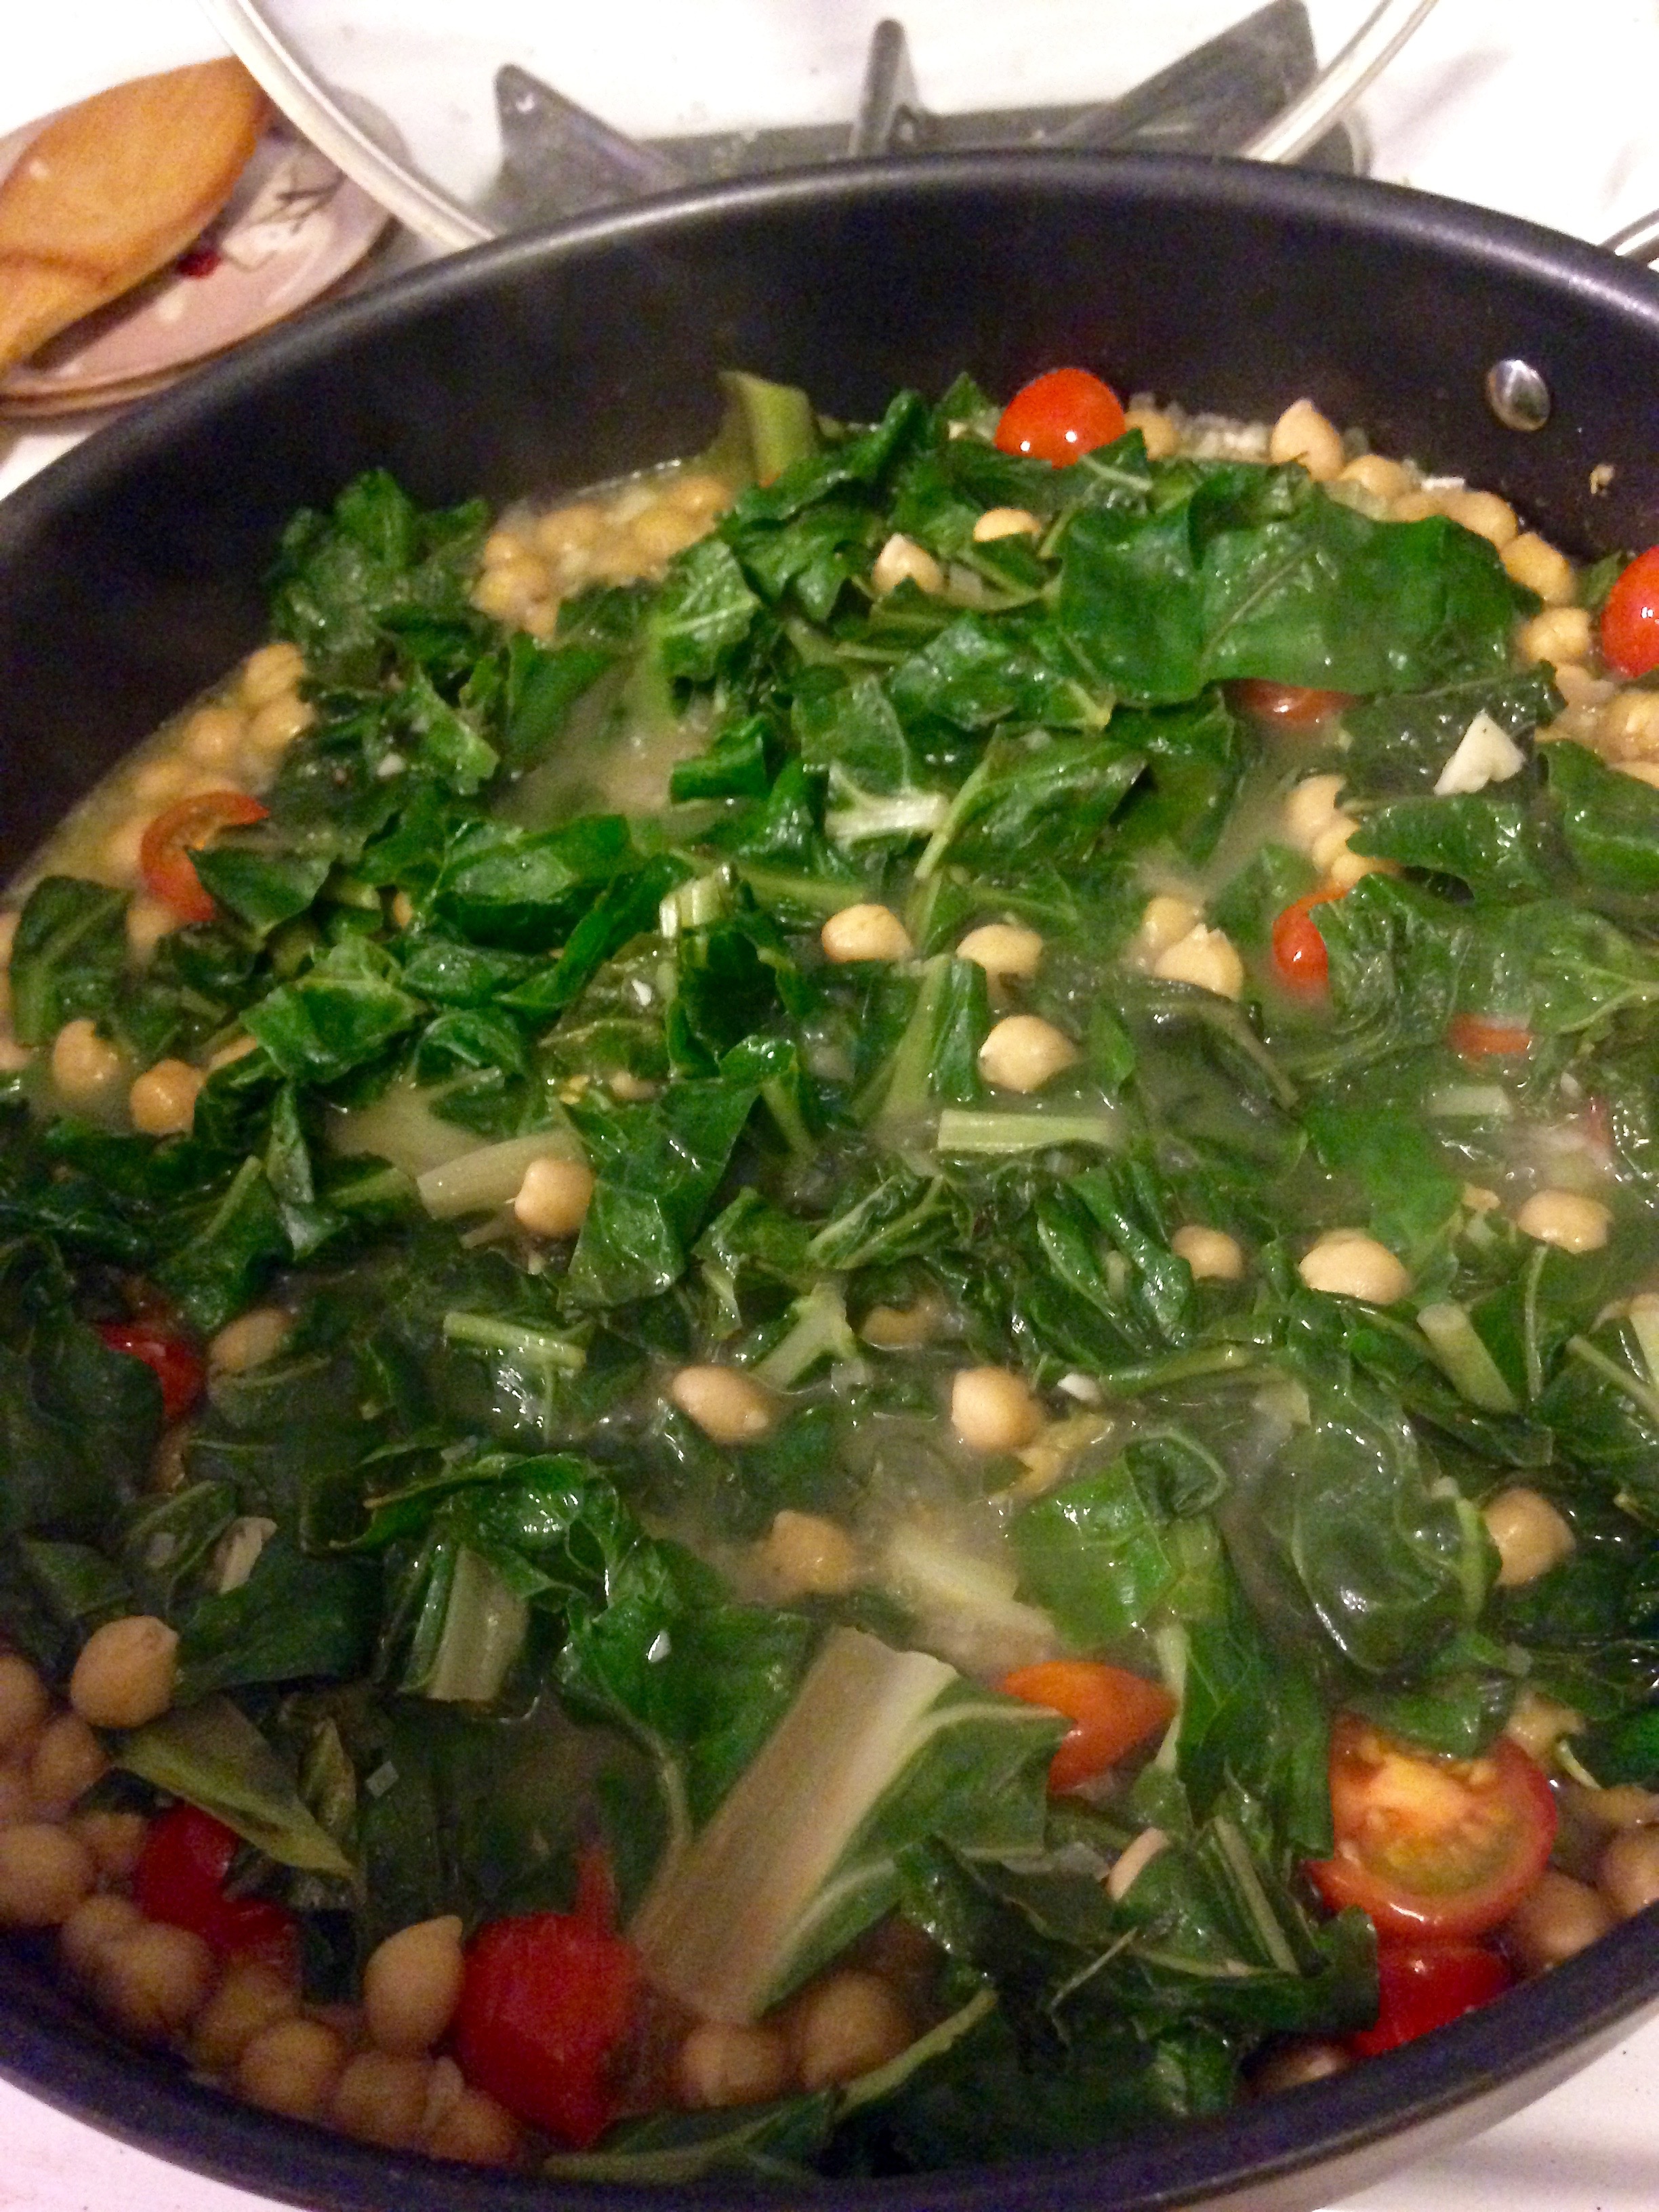
Inspiration struck at dinner the other night, my wife and I were celebrating her return from a trip to the east coast and opted for some pasta. She allows us a carb waiver from time to time and this particular night we really went after it, having bread and house made pasta at an excellent restaurant in Culver City, CA called Bucato. Their ever changing menu featured a dish that was essentially just chard and garbanzo beans with a lemon butter sauce. It’s simplicity was striking and richness of flavor impressive enough for me to tackle the concept at home, albeit with substantially less butter and salt I’m sure. Do not be intimidated by the use of the word “sauce”. It is merely a mix of liquids naturally present in the cook and heated until it reduces a bit. Nothing major here! This is a great way to take advantage of the flood of in season greens that is soon to be upon us. Try it! Substitute chard for spinach or kale if more handy. Add a splash of white wine to the sauce if you’d like, don’t forget to splash some in your glass too!
Chard and Chickpeas in a Lemon Garlic Sauce
This plus some broth is all it takes
4 Servings, 20-30 minutes
8-10 full leafs of chard, rinsed and chopped down.
1 large shallot (diced)
2 cloves of garlic (chopped)
2 cups of chicken or vegetable broth (1/2 of one of those standard sized boxes)
juice of 2 lemons
1 can of garbanzo beans (rinsed)
6-8 halved cherry or grape tomatoes (or one medium sized tomato chopped)
1 handful of chopped walnuts
Rinse and dry your greens, chop them into chunks and put in a bowl. Set aside. Juice the two lemons and remove the seeds.
Take a large skillet, put it on medium and toast your walnuts. A few minutes on the heat, give them a stir and a shake, a few more minutes. Set aside and wipe out the pan with a wad of paper towels. (Careful, hot!)
Dice up your shallots, garlic and chop the tomato. Pour olive oil into the skillet and let heat up a few minutes on medium high. If you really want to get this to a restaurant type flavor profile use butter and olive oil. Butter is amazing. It’s also kind of bad for us. Olive oil only tonight. Add the shallots to the heat and let them bloom. Smells good… that’ll get your neighbors attention. Salt and pepper it.
make the neighbors jealous!
Once they are starting to soften, add the garlic and tomatoes. Pour in a splash of the chicken stock and let it reach a boil. After a few minutes of this add the rinsed garbanzos and stir. Add more broth in batches, a little at a time. Give the beans 5 minutes on medium high heat and add the green chard. Pour in half the lemon juice, stir and cover. Taste as you go, have a spoon nearby dedicated to the purpose.
We’re about halfway there
The chard will reduce pretty quickly. After 5 minutes covered, stir it up, add more broth and keep the cover off. At this point it’s almost come together. Add the rest of the lemon juice and pour in any remaining broth. Turn the heat up to high and let the water content steam off. The liquid will become a sauce right before your eyes. Add salt and pepper to taste, you want the liquid to be rich in the flavors of the lemon, garlic and chard.
Take off the heat. Serve over pasta, rice or chicken. Sprinkle the toasted walnuts over the mixture. We ate ours spooned over quinoa with sliced chicken breast on the side. A delicious and simple splash of seasonal gourmet… at home… in under a half an hour.
Once you attach the words “Texas Style” to something you’re potentially stepping into a fight. Let’s get this out of the way. I define “Texas style Chili” as beef chili with lots of liquid and no beans. We could argue chunks versus ground and toppings all day but the bottom line is the same. Meat, tomatoes, onions and spice.
If I’m wrong I’m wrong. Hell, I grew up in Massachusetts. Massachusetts? Don’t you mean Taxachusetts?!?
Sorry. At least it’s not Newww York Cittyyy!!!! (Pace Picante Salsa was not used in the making of this chili)
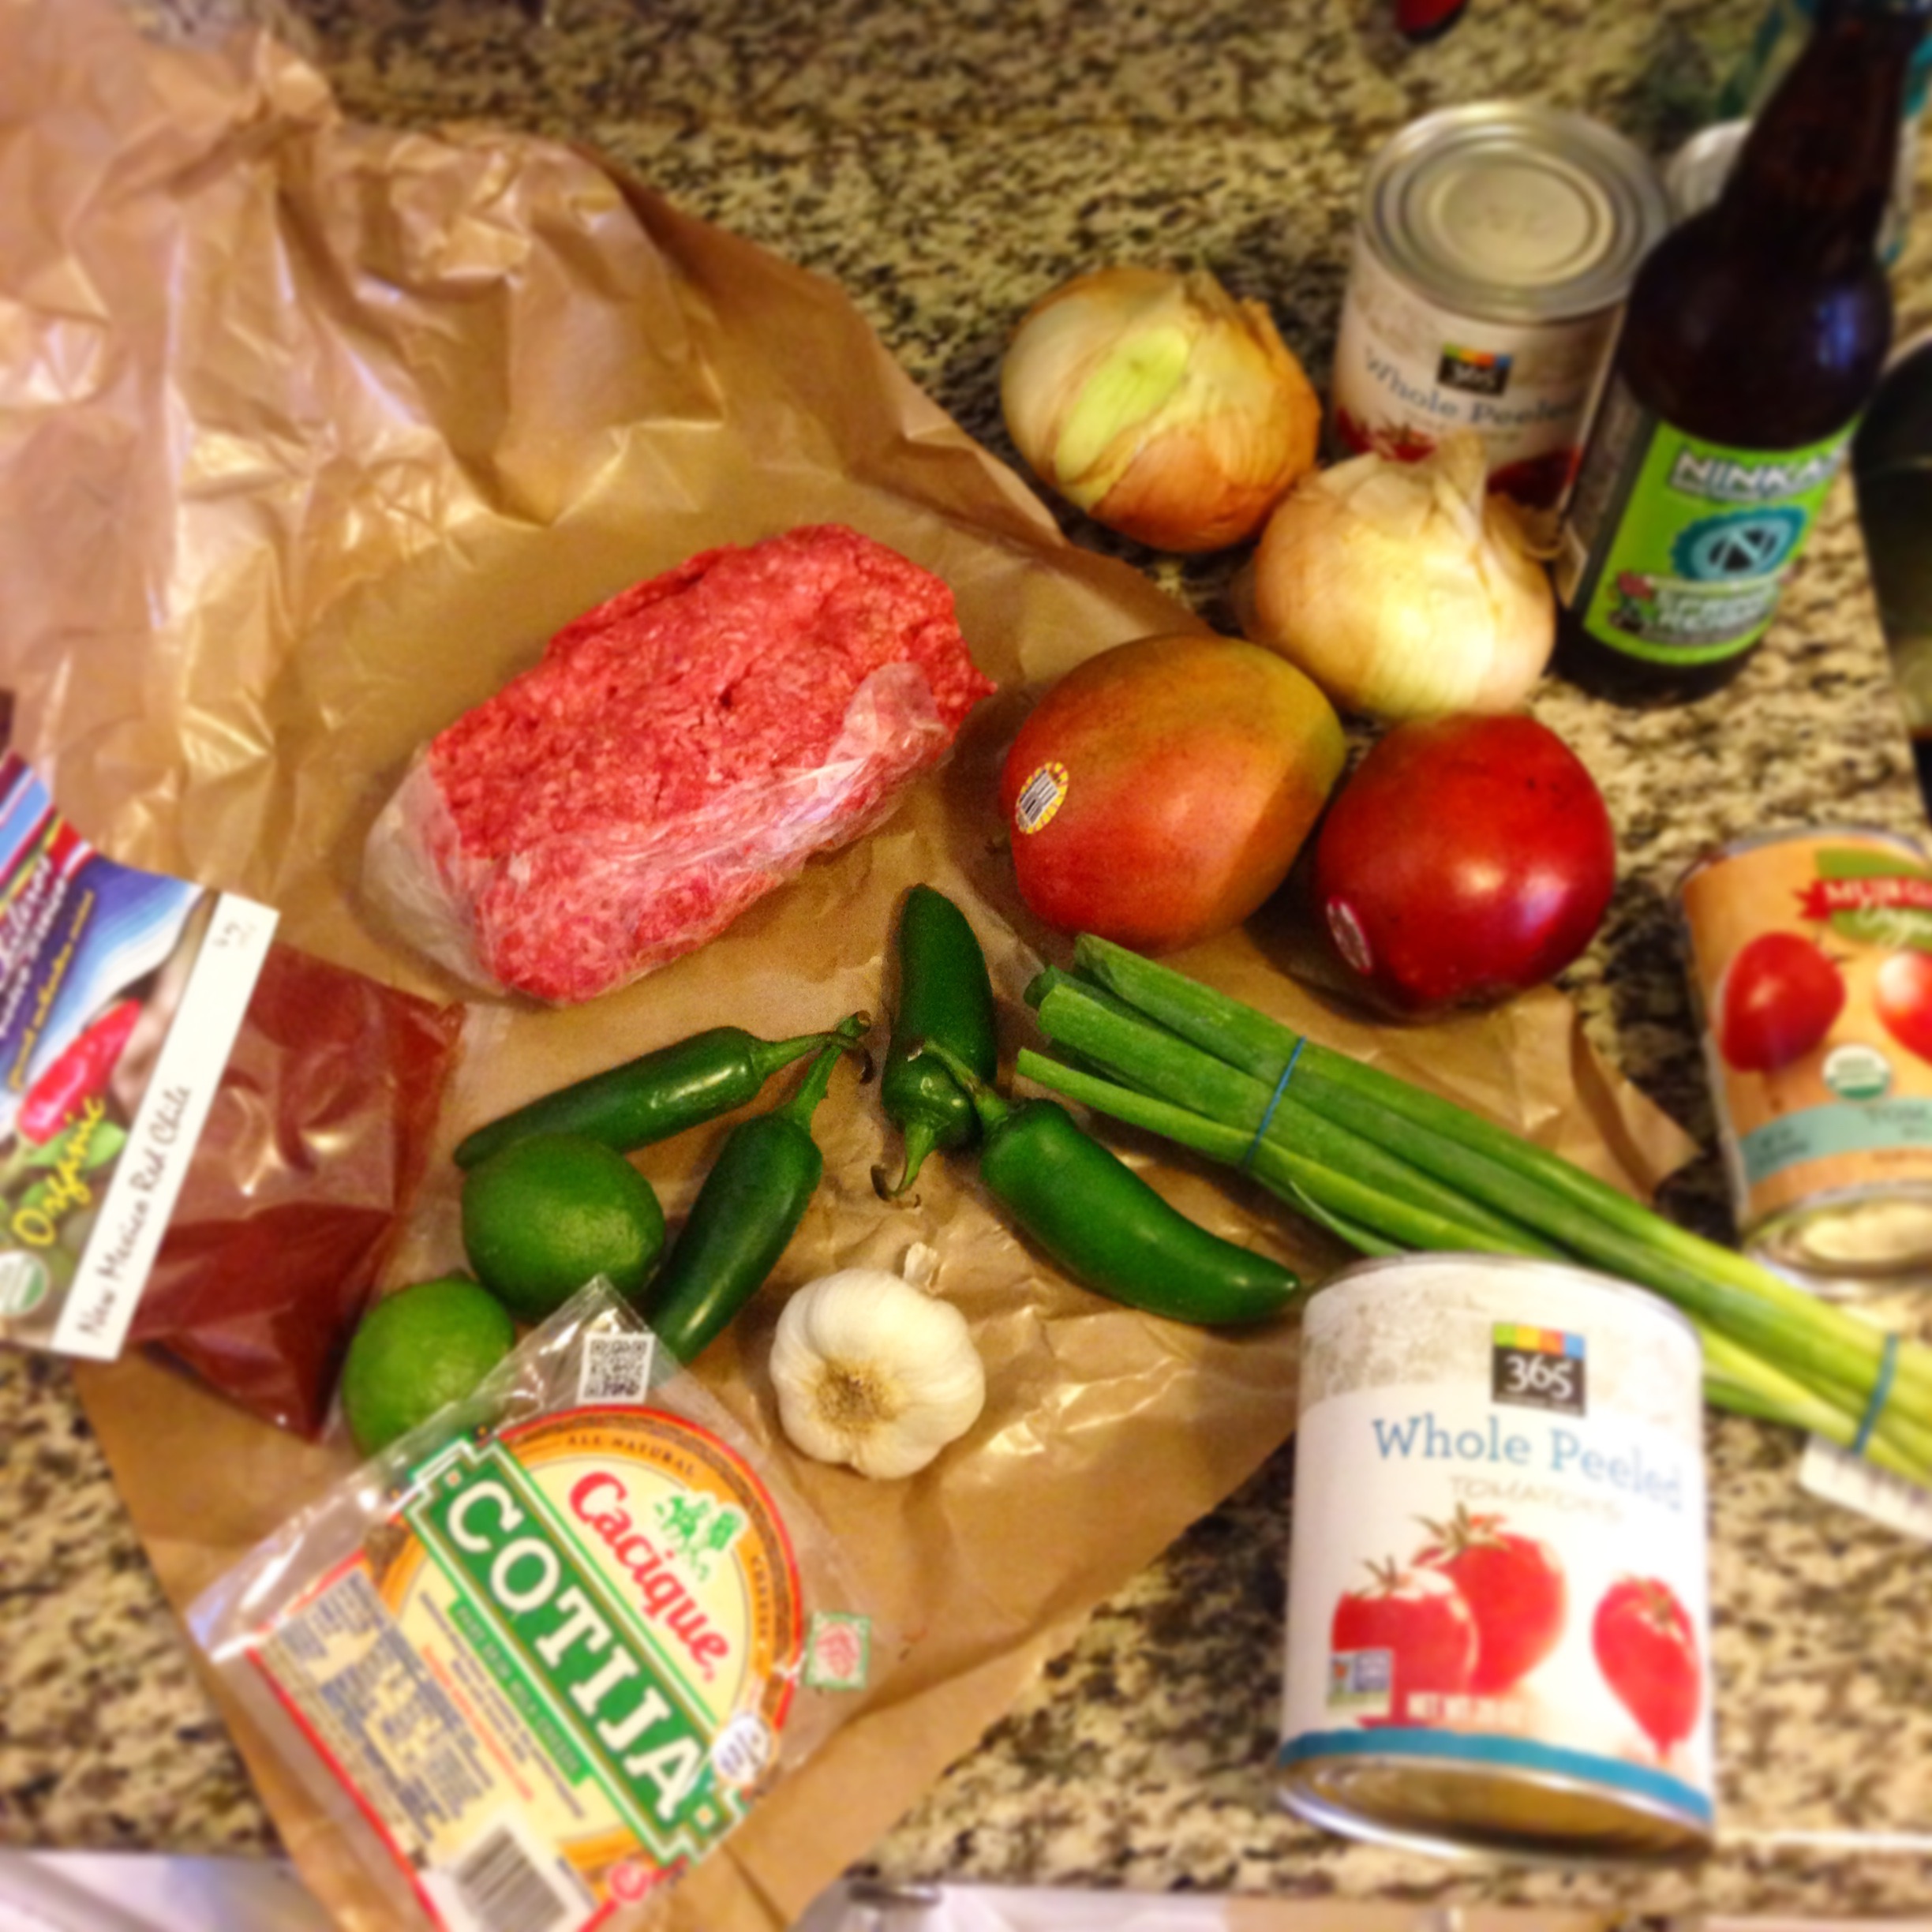
I’m a traditionalist at heart, so here’s my Texas style chili with Mexican cheese and mango. (MEXICO!) (MANGO?!?) Easy and delicious, it will feed a room full of cowboys and city folk alike. Ok, maybe not a traditionalist. A thief. An artist. Who’s to say the difference anyway.
Mango… well mango is in season. The sweetness and texture really contrast the spice beautifully. Cotija cheese or queso fresco is crumbled and chewy and salty and delicious. They’re easy to find in Mexican supermarkets but if you’re not near any just toss in some sharp cheddar. Fresh green onions give a pop of freshness and avocado is… well avocado. It’s good on almost everything. Try it.
Texas Style Chili
Serves 8 Cook time approximately 2-3 hours
2 pounds of ground beef (or turkey, lamb, bison…)
2 large onions
4 jalapenos
1 entire bulb of garlic
2x large cans of whole tomatoes
2x cans of pureed tomatoes
2 large bottles of a fine American Pale Ale
Cumin
Chili Powder
Cayenne Pepper
Salt
Toppings
Mango
Cotija Cheese
Green onions
Avocado
Lime juice
Serves 8.
First things first. Open one of the bottles of beer and pour yourself a glass. Have a sip. Get a big cutting board out and a big soup pot on the stove. Splash some olive oil in the pot, enough to coat the bottom with a thin to medium layer. Get the heat on medium.
Chop up your onions and jalapenos. If you love the spice, add more seeds than not. If you want to manage the heat more on the back end keep most of the seeds out. Add it all into the pot.
Let the onions soften and get to work on the garlic. Peel and chop all the cloves in the bulb and add them all at once to the onions and peppers. Give that a few minutes to work. Add your first *big* pinches of cumin, salt and chili powder. Seriously, don’t be shy. You’re feeding 8 people a dish known for it’s rich flavors. You’ll be spicing again though so don’t worry about guessing the perfect amount. Just get your onions coated in spice and salt for a nice base.
Now add the meat. Mix it every here and there until its browned. Open all your cans of tomatoes while it cooks.
turkey works too!
Once the meat is browned, add more spice. Big pinches.
Now pour in all the tomatoes and tomato sauce.
Open your second bottle of beer and pour the whole thing in the pot. Continue to drink your other bottle.
pour yourself a glass
Put the lid on, turn the heat to medium high and clean up a little. When it’s boiling, 10-20 minutes, turn the heat down to medium and get that cover back on.
Relax. The chili is working. It’s got a hard hat, a safety vest and a lunch pail. Let the chili do it’s job. All you have to do is stir every here and there. Go watch the game, spend time with your people. Nothing to see here. Watch the crowds start to smell the air and get hungry.
After two hours of this, take your first taste. It’s…All… Happening!!!!!
Add more spices. If you want heat that slowly warms you up add one dash of cayenne per person. Work on that formula if you want more or less.
As we approach the three hour mark keep tasting. Add salt, cumin and chili powder in batches until it’s right. Turn off the heat and let the flavors sit.
Now prep your toppings and put them in nice little bowls. Chopped mango, broken down cotija cheese. Slice the green onions and break down your avocado.
When the crowd is about to storm the gates, release them upon your feast. Make sure they add the mango too.
Then open a window. You’ll have to trust me on that one.
The turkey burger. The humble cousin of the American classic beef burger. The dry, crumbly, healthier version of a legend. To me, turkey burgers and sweet potato fries represent a bridge from the American cuisine I grew up with to the health oriented, gourmet style scene that American food is becoming. There was a time when offering a turkey burger and sweet potato fries was akin to shining a Bat Signal in the sky to people who had any interest in eating healthy. Throw in a few house made soups and an espresso machine and you had yourself a healthy cafe. The turkey burger was a symbol of all that.
Back then when you “ate healthy” you accepted that the food you ate wasn’t going to be that good. Dried out turkey patties, vegetarian options loaded with pasta and cheese… good, healthy restaurant food takes a certain finesse and passion that most places didn’t place a premium on. As their customers changed, many restaurants did with them, and thankfully now we can get some options that make us feel better about our waistline (and the planet) all over the country.
Except we’re at home and we can eat as deliciously healthy as we choose. So skip the sleeve of frozen turkey pucks and make your own.
Serves 4 – Takes 30 minutes
One pound of ground dark turkey meat. White meat is acceptable but dark is better. More flavor.
One bunch of scallions
One knuckle of fresh ginger (powdered if you have to but the fresh stuff is best)
Soy Sauce
Worcestershire Sauce
Olive oil
Sea or Kosher Salt
Cracked black pepper
Put the meat in a mixing bowl. Three dashes of soy, three dashes of worcestershire sauce. One dash of olive oil. Two pinches of good salt and several grinds of black pepper.Take a piece of ginger half the size of a man’s thumb and grate it with a zester or the fine side of a cheese grater until it’s almost gone.
Mix it up with your hands. Use a glove if you want.
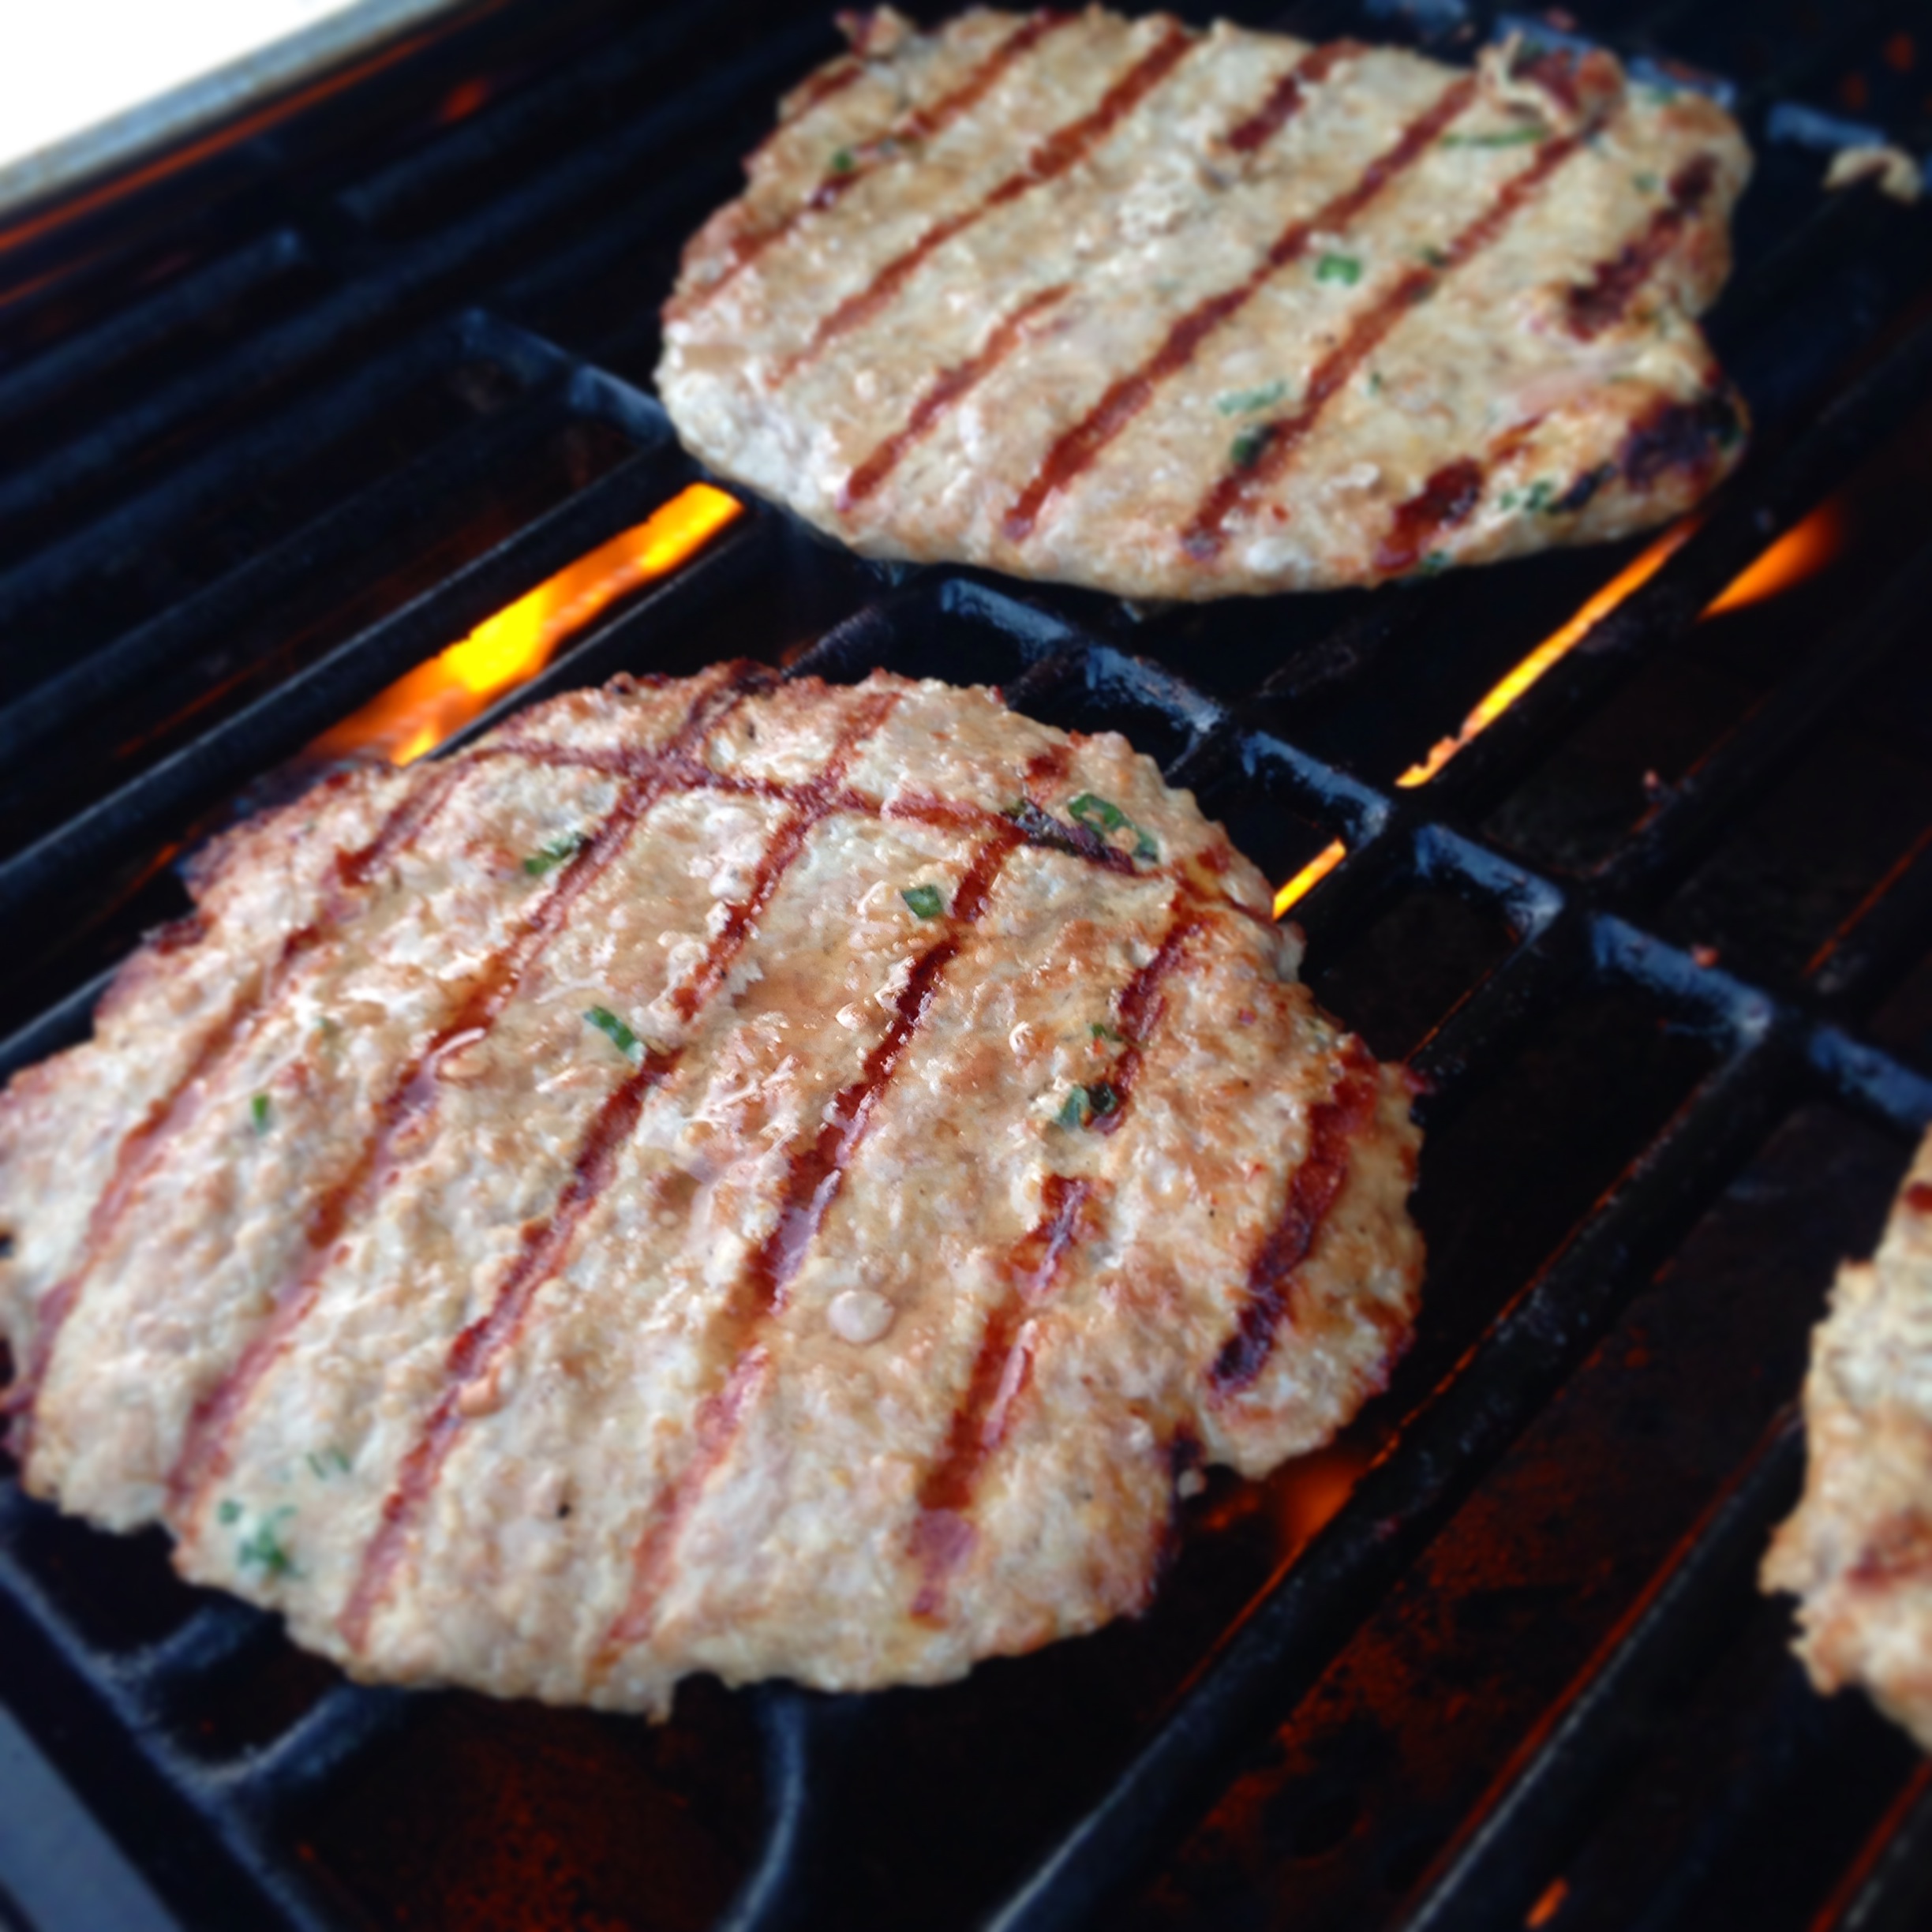
Then, take a quarter of the meat and place on a piece of foil or plastic wrap. Use another piece to squish the patty thin and flat. This helps it cook quickly and get more grill flavor per bite. I leave them between the sheets until it’s time to get them on the grill / in the pan. Repeat until you have 4 patties per pound.
Grill is better, almost always. Stove top is fine too. If you’re in a pan heat up some oil before you place the patty in. If on a grill, turn the thing on high and close the lid for awhile. Let it get real hot. Charcoal? Be a grill master. Enjoy the day.
Once your cooking surface is white hot, place your burgers on. Do not squish the burger. Do not flip the burger. Do not touch the burger. If you’re at a party with a lot of guys who want to contribute to the grilling, appoint one of them to be sergeant at arms and tackle anyone who tries to touch the patties.
Let the patty cook until some moisture starts to pool on the uncooked side. 4-5 minutes. Flip over. Give it another couple minutes,
Want cheese on it? Cheese and Asian flavors don’t have a long and fruitful history but why not. Place room temp cheese on the patty as soon as you flip it. Close the lid to the grill or place a piece of foil over the pan to help melt it fast. Don’t overcook the meat to melt the cheese.
Serve over bread or wrapped in a big leaf of lettuce to your adoring masses
There is no greater link to my past than preparing festive food on a budget. This kind of cooking is in my bones. Generations of Lithuanians and French Canadians speak through me as I stir and chop and taste. I connect with the ghosts of family past in my kitchen with flavors and scents. I can feel my grandfather in the room, his colloquialisms echoing in my brain. If not just for one day our holiday feasts cut through the extra noise of this modern life. We return to a time when food was our only form of entertainment at home. Sure we steal glances at our phones, but only occasionally and then feel bad about it afterwards. Instead we talk to each other, we listen to one another… and most importantly, we eat.
I was struck by inspiration for this years Easter dinner by one wayward glance at the butcher counter more than two weeks ago. The sight of short ribs got my gears turning. What a perfect holiday meal to serve our guests… It hits all the marks… Easy, delicious, cheap. Once you get it in the oven your work is basically finished… Short ribs it had to be.
Let’s get to it.
Serves 4-6 Approximately 3 hours
3 pounds of bone in short rib (boneless is fine too. Costs more but just as good)
3 carrots
3 celery stalks
3 cloves of garlic
1 large onion
4 cups of beef broth (usually one large box)
1 bunch of scallions or chives
1 bottle of red wine
1 small bundle of fresh thyme
1 sprig of fresh rosemary
2 bay leaves
all purpose flour
salt and pepper
A dutch oven or oven safe pot
Pep Talk
Something to remember before you start. This is going to seem like a lot of steps for a fancy meal. Don’t get nervous about it. This is easy. It is really hard to screw up. Even if you skip all these steps and just throw everything in the pot in the oven you will end up with a delicious meal. Remember, this is essentially European peasant food. Cheap cuts of meat, a pot full of vegetables and a bottle of local red wine cooked over fires or baked until it falls off the bone. This entire dish can be done a day ahead, some say it’s even better that way. It’s an ideal meal for entertaining.
Preparation
First step, salt and pepper the short ribs. Then toss them in a large bag with flour and shake them up until they all have a nice even coating.
Set them aside and chop up your onion, celery, carrots and garlic. Turn your oven on 350 (175c).
Pour some oil in your dutch oven and put the heat on medium. You want enough oil to coat the bottom of the pot. Let the oil heat up and place the ribs in one at a time until you have single layer. With 3 pounds this will likely take two batches. Sear the ribs until they’re browned up nicely. 4 minutes or so on each side. Set them aside for later and spoon out most of the oil. Scrape the crusty bits with a wooden spoon and add your onions to the pot. Once they are starting to brown and melt down add your carrots and celery. Stir them up and salt and pepper everything. Add two of the chopped garlic cloves now.
Starting to smell good huh?
Let the mixture cook for 5-10 minutes, stirring often.
Place the seared short ribs on top of the veggies. At this point it doesn’t matter if they’re all arranged perfectly or not, just get them in the pot.
Open that bottle of red. Buy a wine that’s drinkable but don’t spend too much money on it. A table red or a cabernet works great here. Pour yourself a half a glass and dump the rest of the bottle in the pot. Turn the heat up to medium high and make a note of how high up on the pot the liquid is. Keep the lid off of the pot.
Wait for a boil. You’ve got about 20 minutes here and only need to stir a few times. Wash up the cutting board and dishes, get your counters clean.
You want to boil it until the amount of red wine has reduced by half. I tied up a bundle of the thyme and a sprig of rosemary with cooking string and tossed it in with two bay leafs and the third chopped garlic clove. Toss in a couple pinches of flour and pour in the (4 cups) entire box of beef broth.
Cover.Place in oven.
“Siri, set a timer for 2 hours please”
Plenty to do for that time. Set out your appetizers, greet your guests, work on your side dish for the short ribs. (mashed potatoes, polenta, roasted vegetables, risotto, pasta come to mind) I made a parmesan risotto to accompany mine. It came out pretty good but not good enough for me to tell you how to make it. Maybe next time.
When the two hours is up take a look at your masterpiece.
I pulled out the bones with a pair of tongs and tossed them. Using the tongs, break up the meat until it’s shredded. If the bones don’t come out easily and the meat doesn’t shred with a light touch give it some more time. Stir up the mixture and have a spoonful. Add salt and fresh cracked black pepper to taste and put back in the oven for 30 minutes. This is when I made my (decent) risotto.
When finished, serve your amazing short ribs over your amazing side dish. Top with chopped green onion or chives. Pray for leftovers.
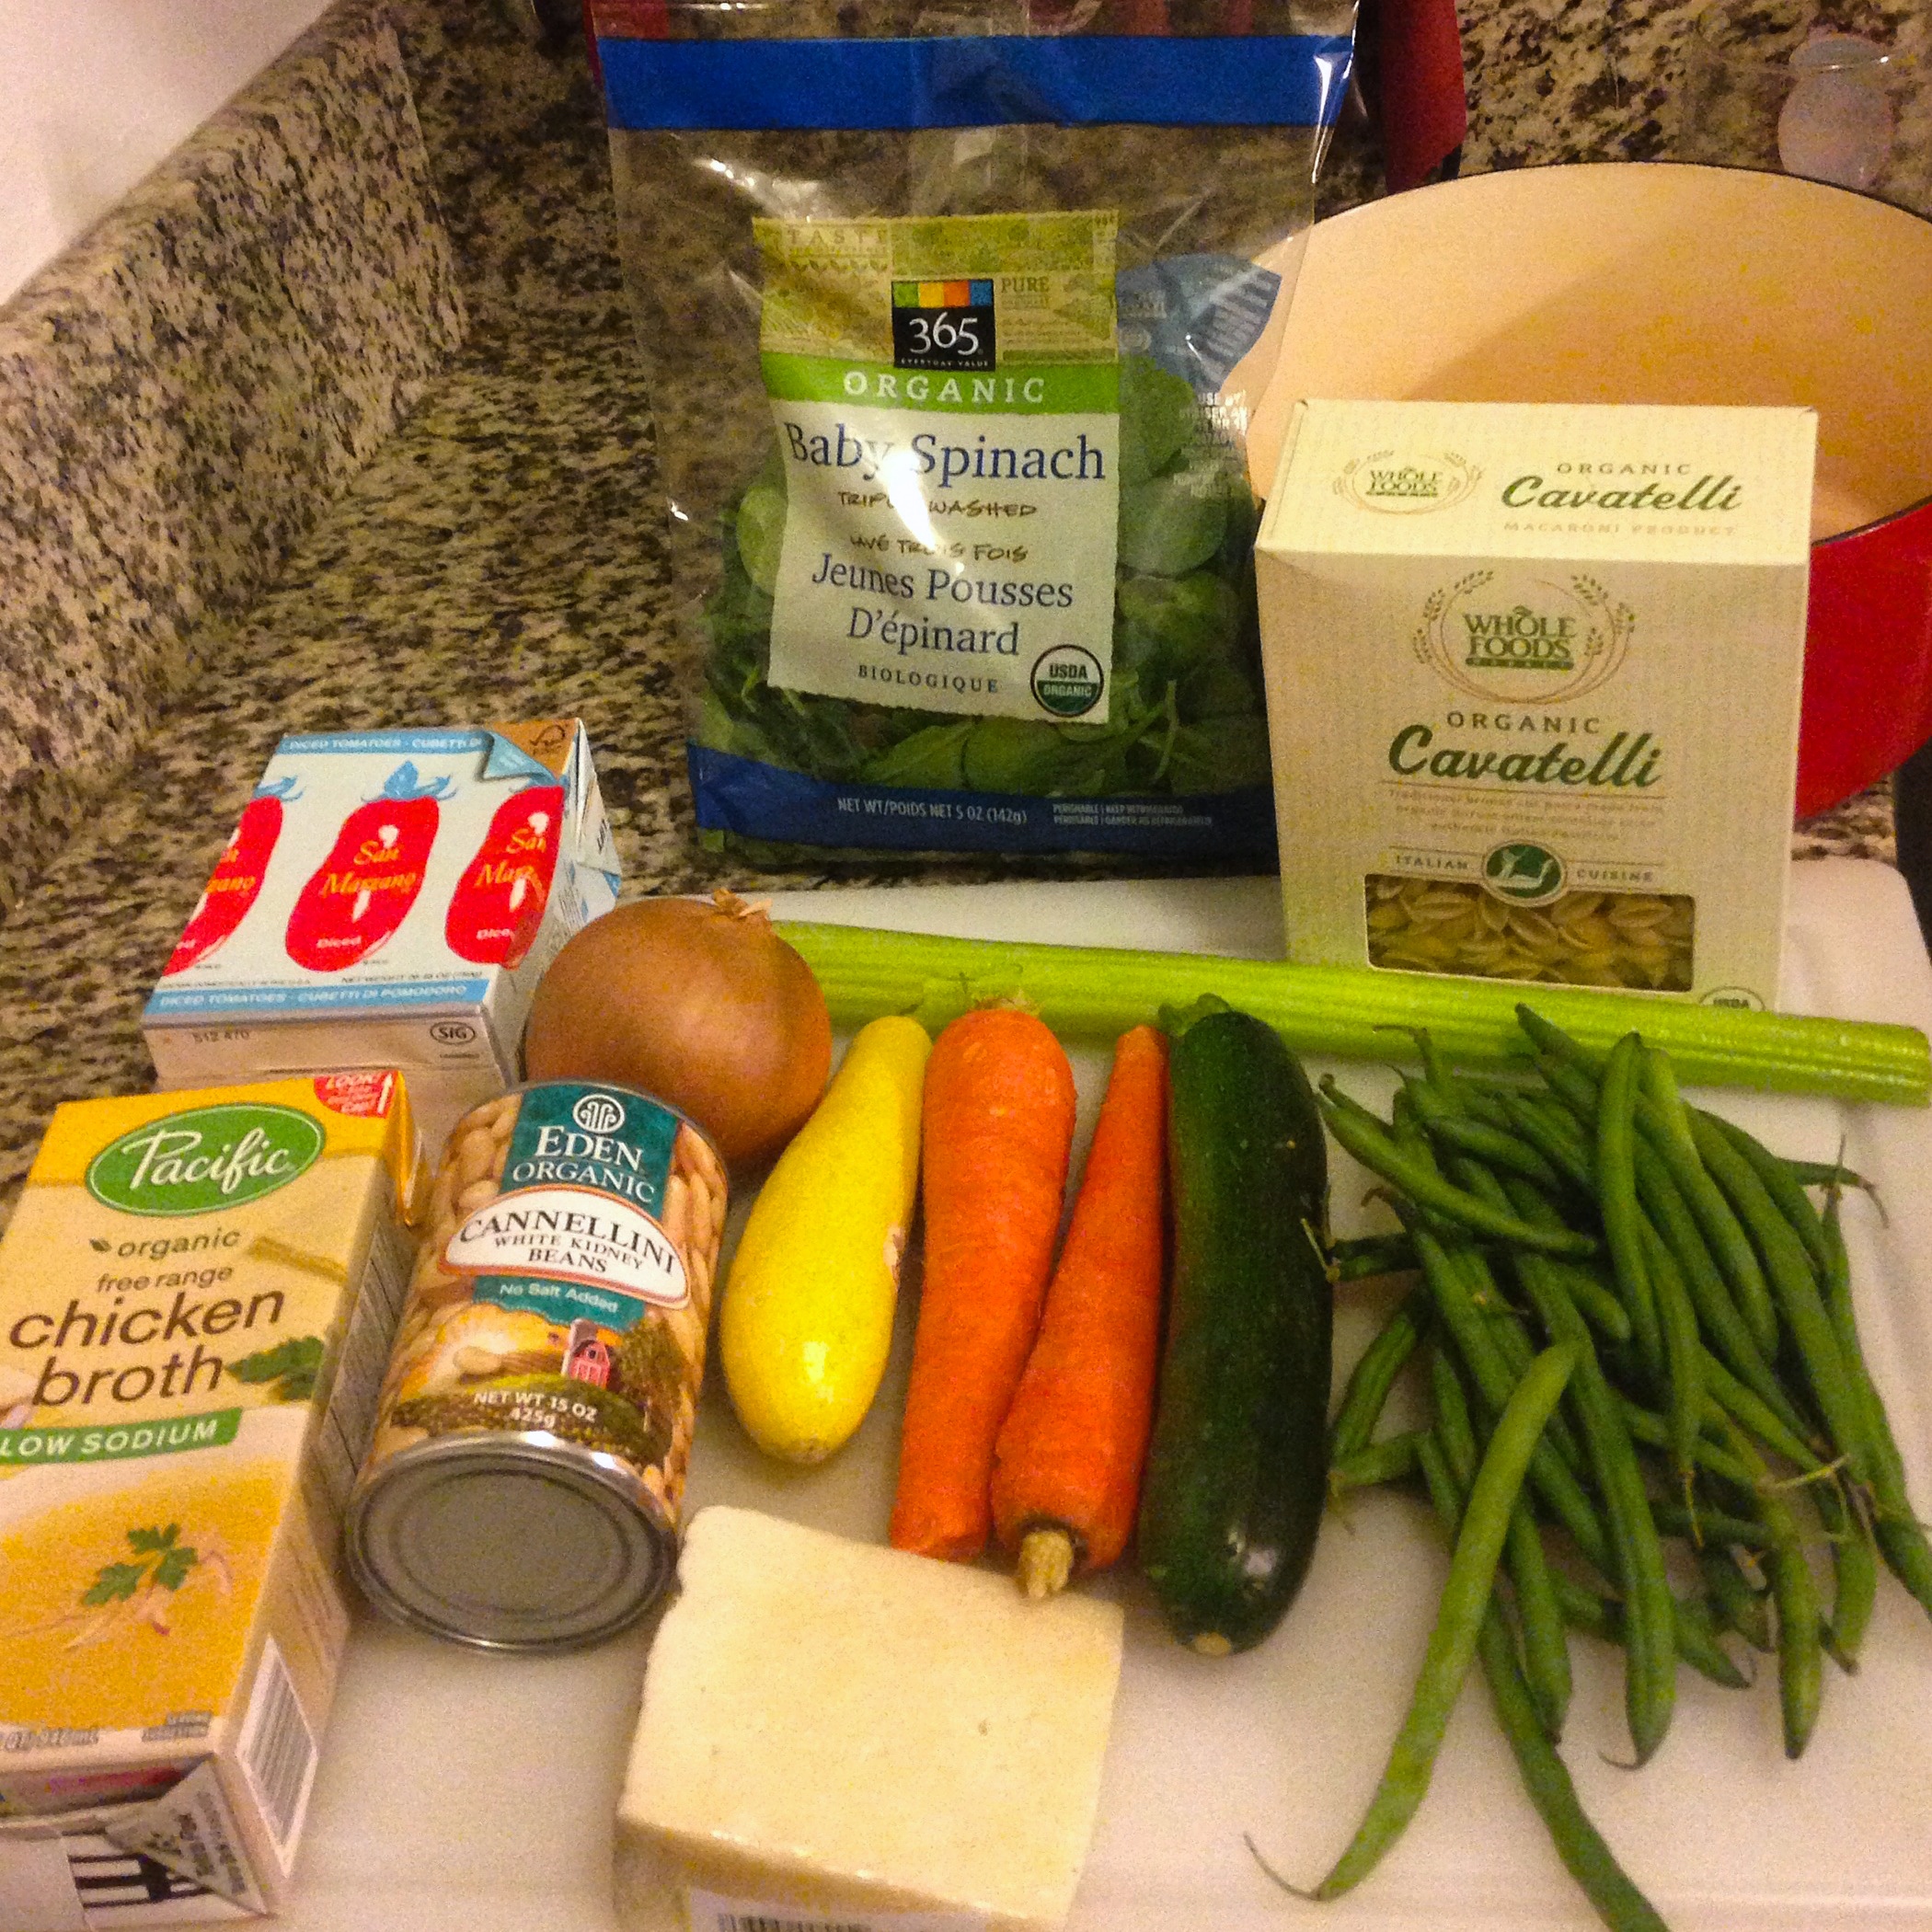
Oh Minestrone… How I love thee. It, like so many food memories, takes me back to childhood, to memories that are so old and faded that they’re best described by colors. A whiff of a maturing minestrone soup on the stovetop will transport me to a time when chairs were something I had to climb to sit on. It’s bright and savory, steeped in herbs and hearty with cannellini beans and pasta.
I spent a few days last week working with a fellow food lover. We spent hours talking about this spot and that, our favorite dishes and preparations. We swapped tips and techniques and sat down to two exceptional working lunches. At one point minestrone came up (he uses swiss chard, brilliant) and it got it stuck in my craw, the craving sat in the top of my stomach from the moment it was breached. By hour 40 I had broken. It had to be done.
Minestrone Soup
Serves 6-8 45-60 minutes
Ingredients
1 clove of garlic
2 carrots
1 celery stalk
1 medium yellow onion
1 small yellow summer squash
1 small zucchini squash
1 large can of crushed tomatoes
1 can of cannellini beans
6 cups of chicken/ vegetable broth
2-4 cups of uncooked baby spinach
A handful of fresh green beans
1/2 cup of a small pasta shells
A hard italian cheese… Parmesan, Romano… (or, if you’re feeling classy, Pecorino)
1 Baguette
Dried herbs
Marjoram (oregano works too)
Thyme
Sage
Basil
2 Bay Leaves
Sea salt
Cracked black pepper
Preparation
Get everything out and organized. Set up a slop bowl for peels and ends, it keeps you from running back and forth to the trash.
Splash some olive in a pot on medium, break down your onions, carrots and celery into small bits. Salt & pepper, 2 layers of thyme, 1 layer of marjoram(or oregano) and a dash or two of basil and sage. Stir the mix and put the burner on medium high.
Get to work on those green beans. I’ve never really figured out a perfect method with beans. I just snap off the stalk end with my fingers and work my way through the pile. Snap, next. Snap, next… Then I try to bundle them all like matchsticks and cut them into 1 inch pieces.
Slice the garlic, toss it in.
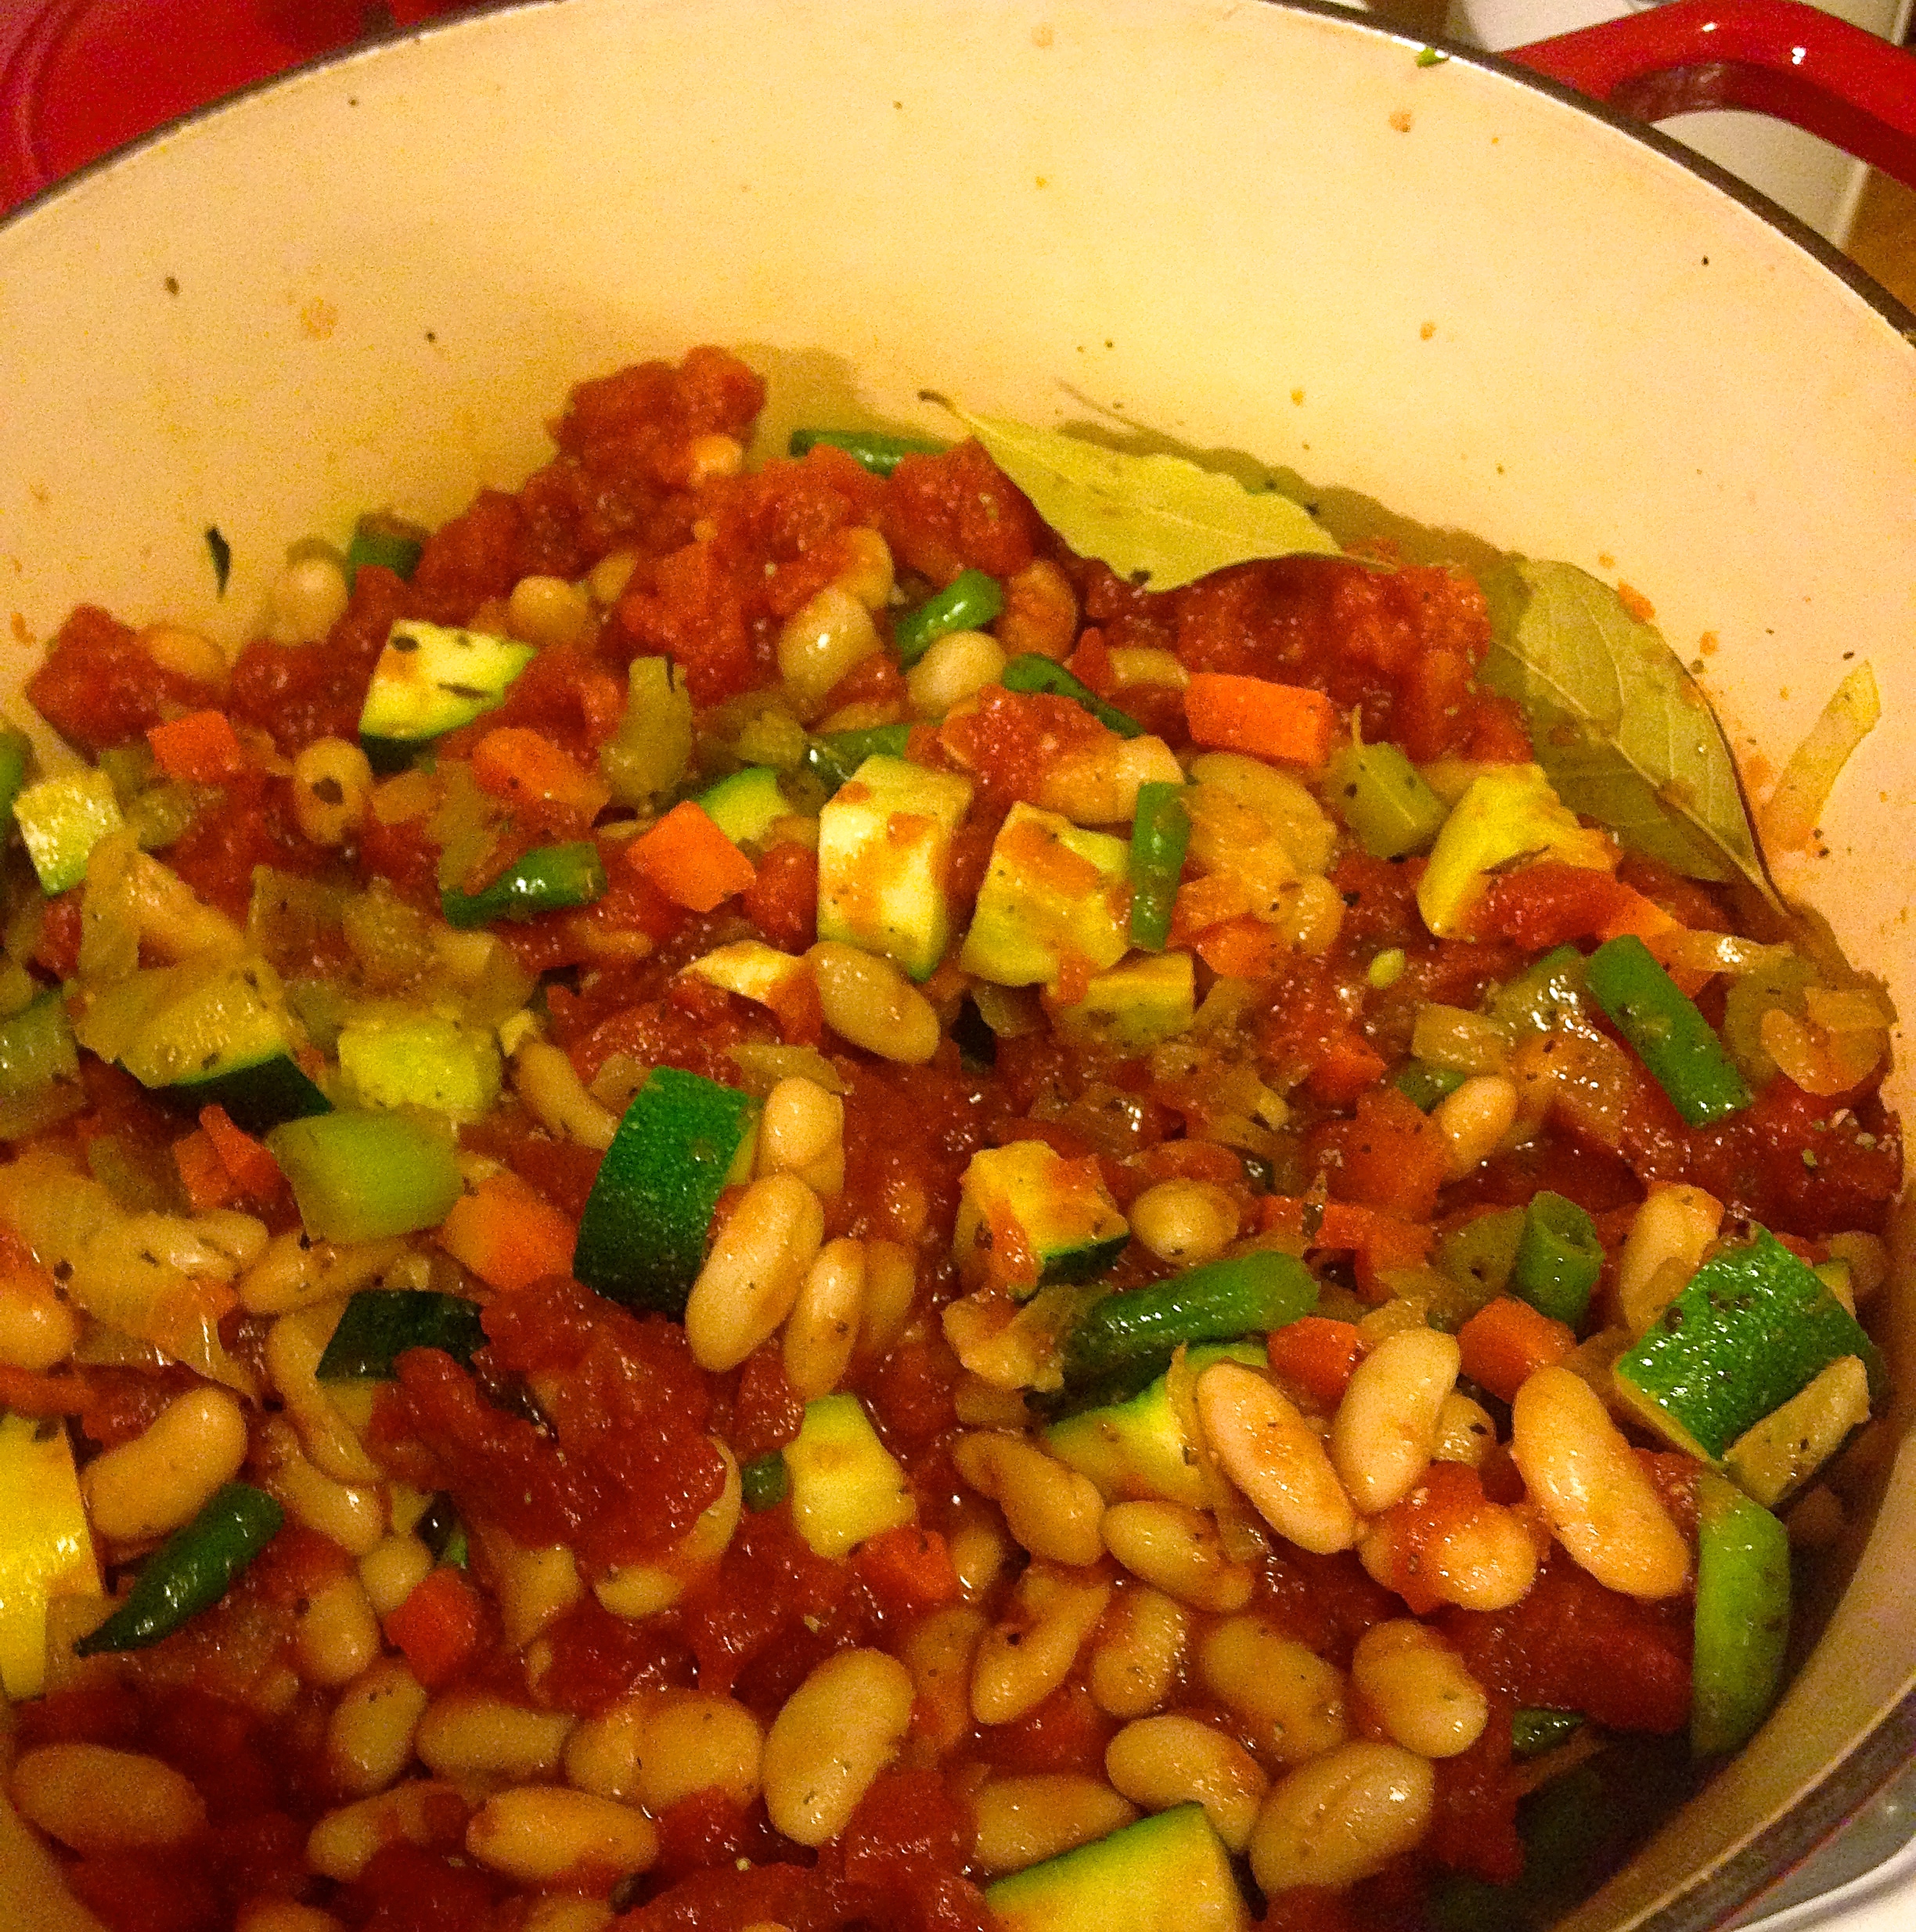
Quarter your zucchini and summer squash and chop it down. Into the pot it goes. More salt and pepper. Stir.
Add the tomato. Rinse the beans good if they’re out of a can and put them in. Salt, pepper, another coating of herbs. Bay leaves. Stir.
Note the order I did that in. Onions first, almost always. Everything else goes in order of vegetable firmness. Garlic usually in the middle, you don’t want it to burn and get bitter.
Mama Mia!
Give this a few minutes. Absentminded? OCD? Set a timer for 4 minutes and twenty three seconds.
Pour in your 6 cups of broth and stir. Turn heat to high and cover.
Do you have any old Parmesan rinds kicking around? Got a great tip this week, save your rinds in the freezer. Pull them out for jobs like this. I happen to have one in the fridge. Toss that in the soup.
Bring to a boil. This is where I clean up my mess. A clean kitchen is a happy cook! Working quickly I had enough time to clean up all the dishes I had just used and wipe down the counters.
Once the soup is boiling give it another stir and turn the heat down to medium high. At this point you can do it a few different ways. If it’s the weekend and you feel like torturing your friends and family, turn down the heat and take your time. Let the smell whip the guests into a frenzy. (A trick I learned from my mother) They’ll be knocking each other over by the time you’re ready to serve. If you’re in a hurry like me, keep whipping that soup into a boil. Ze flavors must marinate! Ze broth must reduce! Work soup work!
A boiling soup is a reducing and thickening broth. You need some of that to concentrate the flavors but you don’t want it too thick. I like my soups with a lot of broth so I keep the cover on for most of the cook, pulling the lid off at the end for a mad dash 5 minute reduction. It’s a balance. You can always thicken more with uncovered heat. Thinning the broth is a little more complex and I try to avoid it.
Boil some water for your pasta and get that going. Follow the instructions on the box for timing. Drain the water and set your pasta aside.
Why do this? Extra steps and extra dishes? Not usually our style here in the mancookgood kitchen.
I do it because I don’t want to leave the pasta in the soup for leftovers. Same goes with rice. It continues to absorb the liquid and by day two or three my beautiful broth is a solid block of bloated pasta. It’s like a parasite sent to drink up all that goodness. Like Uncle Jack, it never stops drinking.Not today Mr. Cavatelli. Not today.
By this point your soup should be beginning it’s descent into flavorland. Drinking a glass of wine? Red? I was. Splash some in at any point.
Slice your bread and get it ready. (Toasted? I did) I like to put it in the toaster oven pre buttered. It makes for a soft interior and crispy edges. Who doesn’t like crispy edges? Bring them to me.
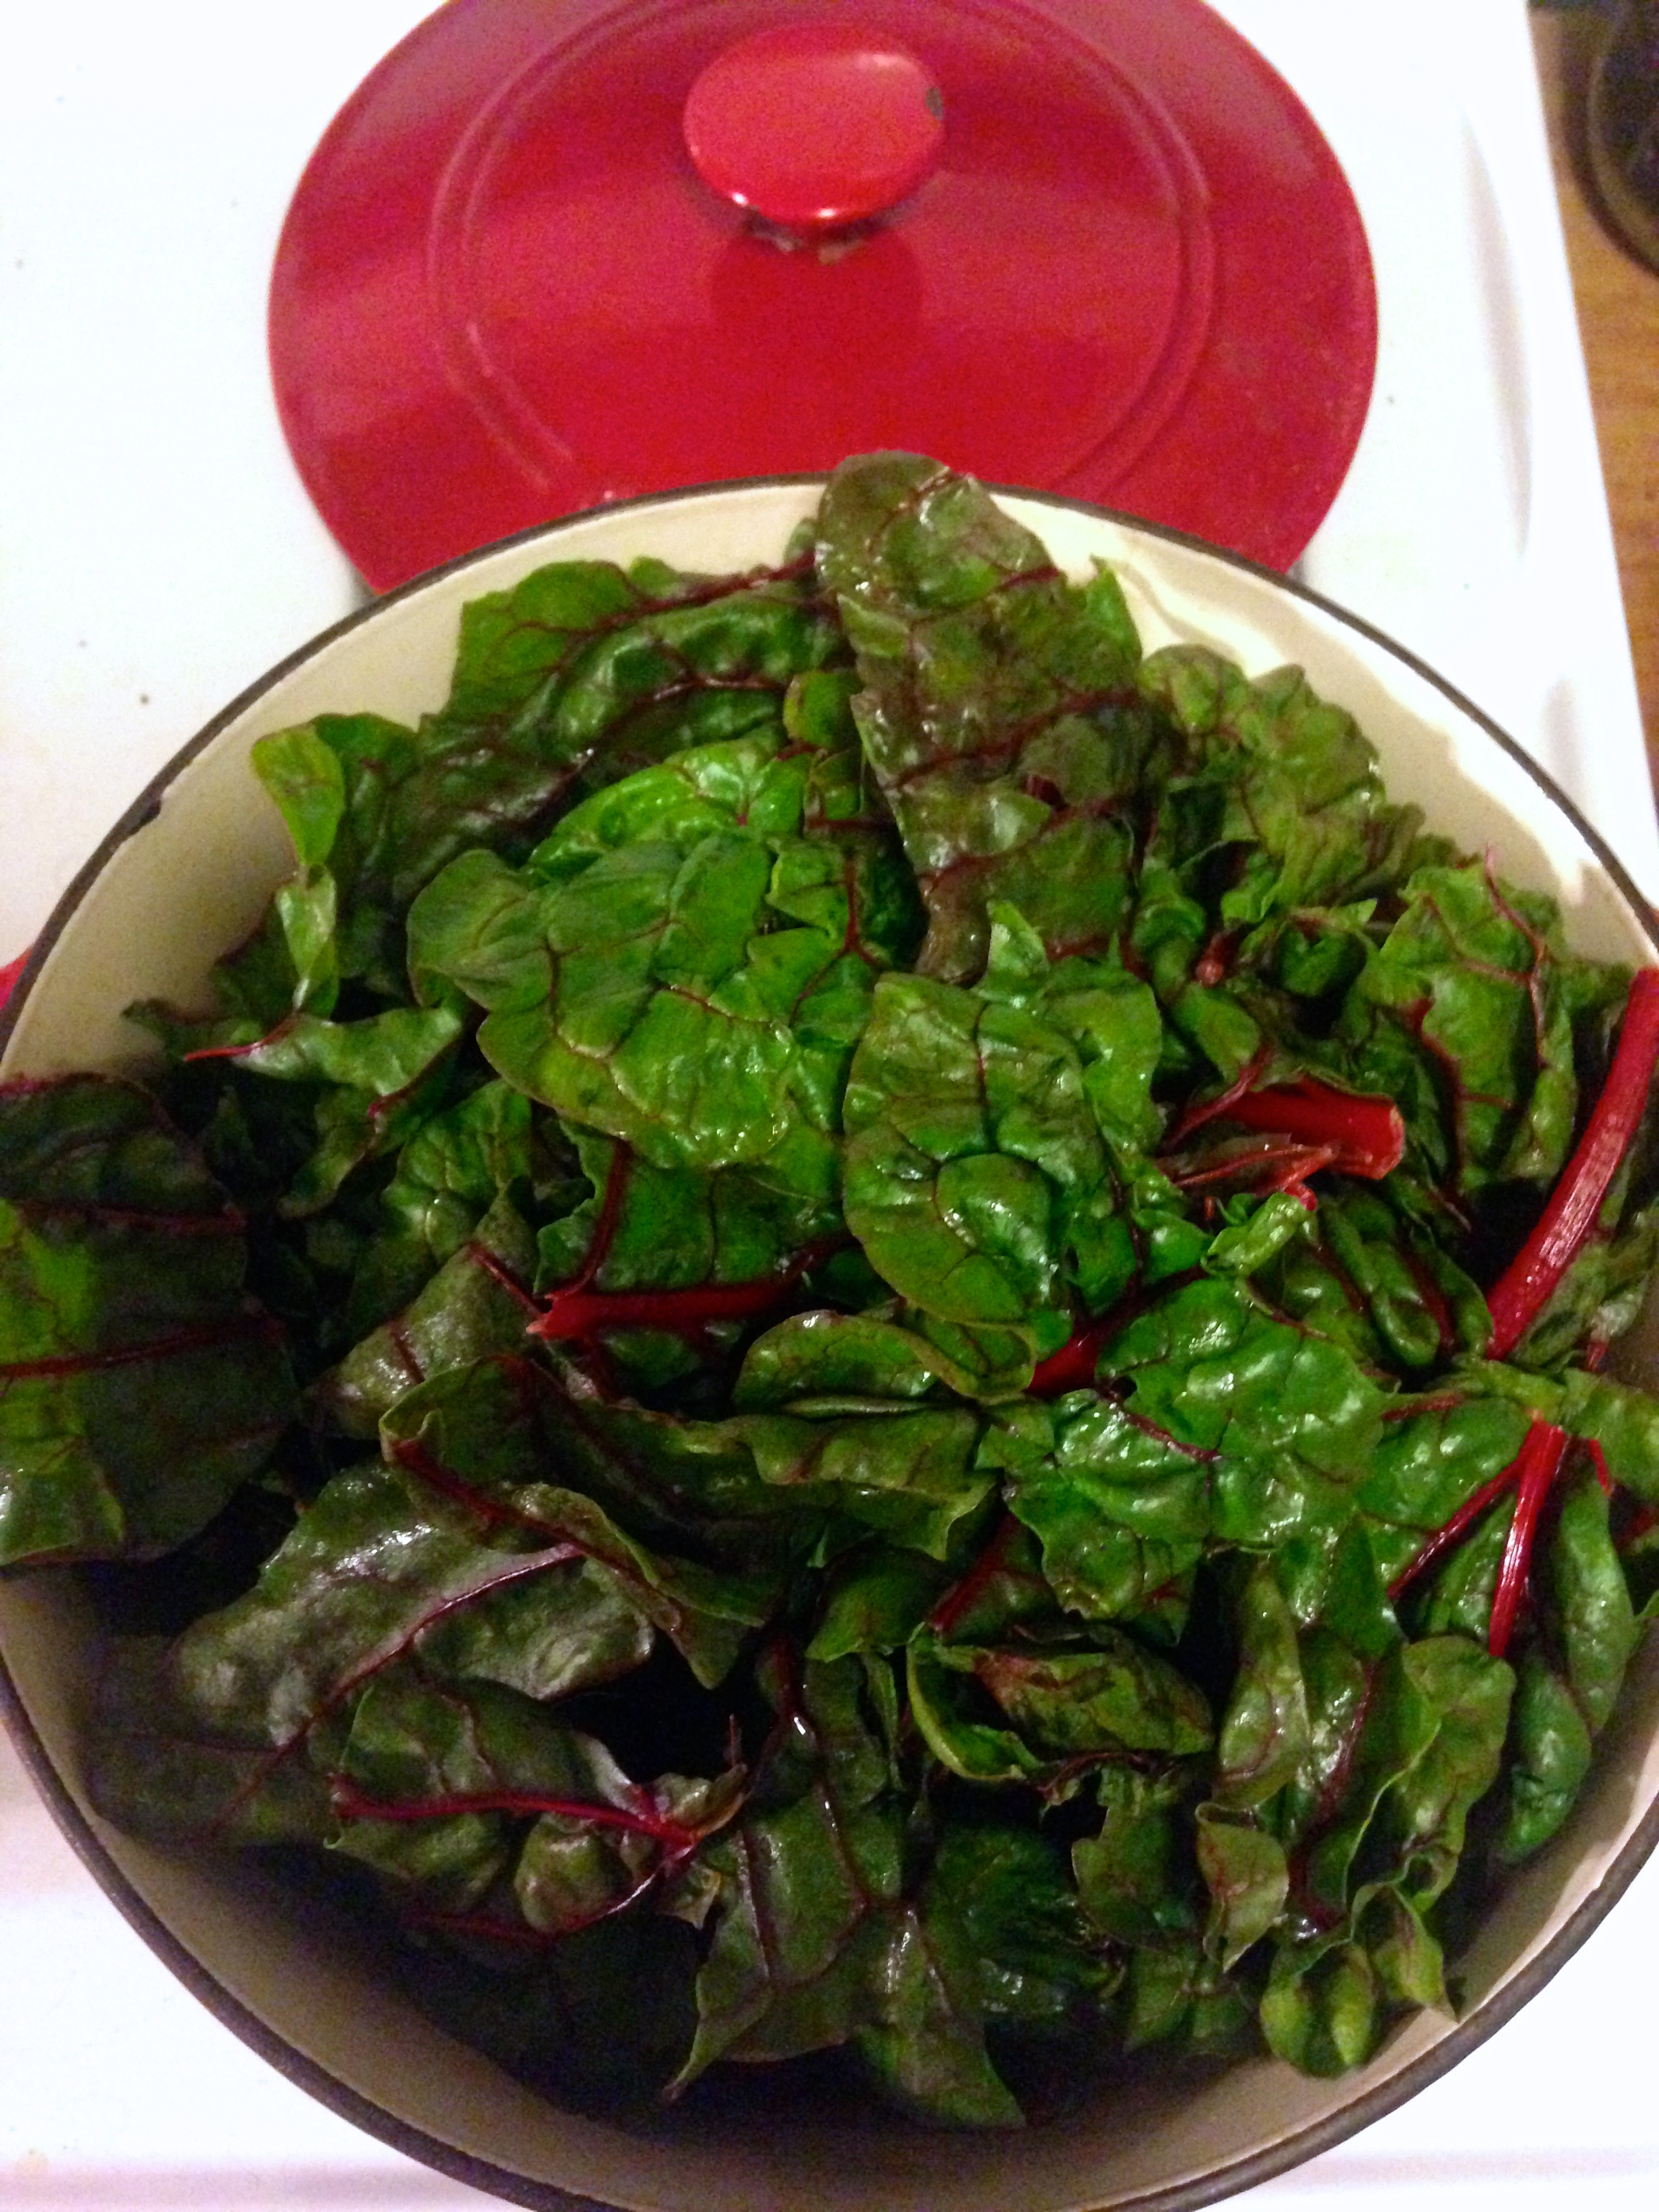
Add the spinach. Yes, all of it. It reduces, trust me. Stir it in as it shrinks.
Taste the soup. It should almost be there. Check the carrots, make sure they’re soft. Turn up the heat and take off the lid. Please put your tray tables up and in an upright position, the pilot has turned on the fasten seat belt sign. 5 more minutes of an uncovered boil, taste it again. Hot!
Here’s the most important part.
Spoon the soup and some cooked pasta into a bowl and grate your cheese over it. This is nearly non negotiable. Lactose intolerant? How bad? Grate the cheese and take a pill or something.
Sprinkle some chili flakes and a spot of pesto if you have it hanging around. Serve with the bread and a smile. Make the soup. Win the day.
I remember the day my wife (then girlfriend) told me she wanted to stop eating meat.
I was devastated.
She was never much of a meat eater but always ate what I cooked. In those days my food was pretty standard fare. Meat. Vegetable. Starch. The occasional meatless dish usually featured pasta, and even then hopefully a sausage link or meatball or two on the side.
So I mourned. Not only for the ease of ordering and restaurant selection but for the style of cooking I had begun to develop. What would I cook? Did I now have to make two versions of everything? What about the meeeeattttt?
Now years later I (again) have my wife to thank for another transformation. These days I cook meatless more than not. I’m not talking about tofu flavored sprouts or factory made “chik’n”. I hate that stuff. I’m talking about hearty, delicious entrees that fill you up and don’t leave you lacking.
When cooking vegetarian the key is to work protein in as much as possible. This dish, with lentils, swiss chard, almonds and feta is loaded with protein and vitamins. The use of oregano, sage and fennel seeds give the lentils a very meaty flavor. Don’t feel up to a vegetarian dish tonight? Brown some sausage and add it to the mixture at the end.
Super foods unite!
1 Head of Swiss Chard
1 cup of dry lentils
4 cups (one large box) of vegetable stock
2-3 stalks of celery
2-3 carrots
1 onion
A half of a lemon’s worth of juice
2 cloves of garlic
a handful or two of almonds
feta cheese
Powdered sage
Fennel Seeds
Oregano (or Marjoram)
Bay leaf
Olive Oil
Salt
Pepper
Start by chopping up your veggies. Dice them up pretty small, especially the carrots. Heat up some olive oil on medium high and get those onions in the pot. Salt, pepper, a layer of sage, oregano and two dashes of fennel seeds. Add the celery and carrots. Shake out another layer of sage and oregano. Toss in the chopped garlic. Stir.
Smells good!
Once that has all started to work together pour your vegetable broth over the whole thing, dump in your lentils and cover. Add a bay leaf and turn the heat to medium.
Now for the swiss chard. This is a pretty robust leaf. If you bought it from a farmers market or in a bunch like me it’s quite the handful. I filled up the clean sink with cold water and broke the chard down by hand into more manageable pieces. Remove the really big stalks with scissors or a knife and work your way through it all, stopping occasionally to stir your lentils. You want them on a light boil and the cover on so you don’t reduce the liquid too much.
Run your swiss chard through a lettuce spinner. If you don’t have a lettuce spinner you’re in for some work. You should buy one anyway. Next time. Shake the leaves out by hand, press them with dish towels and accept that they’re going to have some moisture on them. No big deal.
At this point I would take the cover off of your lentils and let the liquid reduce down to about half of its original volume. Add the chard in batches, filling the pot, covering it, stirring it, covering it, repeat. You may think it can’t handle more but don’t worry it will reduce considerably. Add some more herbs. Salt and pepper again. Once you get the chard in stir occasionally while letting it cook.
Load it up!
Chop up some almonds and toss them in a small skillet on medium low heat. Let the almonds toast up with an occasional stir.
Taste the lentils. Too firm? More time. Liquid reduced too fast? Add some water. Watery? More heat, less cover, more spices. The lentils and chard are done when there is enough liquid left to be a sauce but not quite a broth. Add the lemon juice, give it a good stir and turn off the heat. Give it 5-10 minutes to cool down a bit and let the flavors calm down and mix together.
Scoop on its own or over a grain. Add the almonds and some feta cheese at the end.

 All it took was one nip of cold air and now all I want to do is make soup. This crowd pleaser is super simple and can be prepared several days in advance.


