Tag Archives: Cooking

Asian Chicken Meatballs in Butter Lettuce Wraps

Asian Chicken Meatballs

This dish came out of nowhere. In an attempt to stave off high cholesterol medication I’ve been eating a lot of lean proteins and greens. For a couple weeks I found it fun to revisit the humble chicken breast. It brought me back to my early days of cooking, back when a bag of frozen chicken breasts was always in my freezer and I would dream up new ways to enjoy the staple item. Yesterday however, I was bored. I wanted something bright and light, something fun and new to make and eat. My mind wandered and landed on the classic flavor profile from Asia.

Soy sauce, ginger and green onion.

The game was afoot. The race was on. Off to the store.

Servings 4, Cook time 30 minutes 

Asian Chicken Meatballs in Butter Lettuce Wraps

  • 1 1/2 pounds of ground chicken. (white meat is fine, dark meat is better)
  • 1 bunch of green onions
  • 3 cloves of garlic
  • Soy Sauce (Low sodium if you have it)
  • 1 egg
  • Bread crumbs (I used panko)
  • 1 head of butter lettuce
  • sesame seeds (optional)
  • Fresh Ginger, a piece about half the size of a man’s thumb
  • 1 ripe Avocado

Dipping Sauce 

  • Soy Sauce
  • Rice Vinegar (Or White Wine Vinegar)
  • Sriracha (or Chili Oil)
  • Sugar (Or honey)
  • Sesame Oil (or Olive Oil)
  • Sliced green onion

Method

Preheat the oven to 400F / 200C. Finely slice and chop your garlic and onions, rinse off your lettuce and toss the chicken in a large mixing bowl. Add the onions, garlic, cracked egg and soy sauce to the bowl. Grate the ginger down using a zester or the fine side of cheese grater. Use enough soy sauce to create a puddle around the chicken. Don a pair of gloves or using your freshly washed hands, dig in and start to mix by hand. It will be very soupy. Mix just enough so that your ingredients are together and add a layer of breadcrumbs. This is when using the buddy system really helps, have them pour some in the bowl so you can keep your hands on the mix.

Asian Meatball Mix, pre Breadcrumbs

Mix in the bread crumbs a little at a time. You want the mixture to be able to stick to itself and form into balls without using so much that you dry it all out.

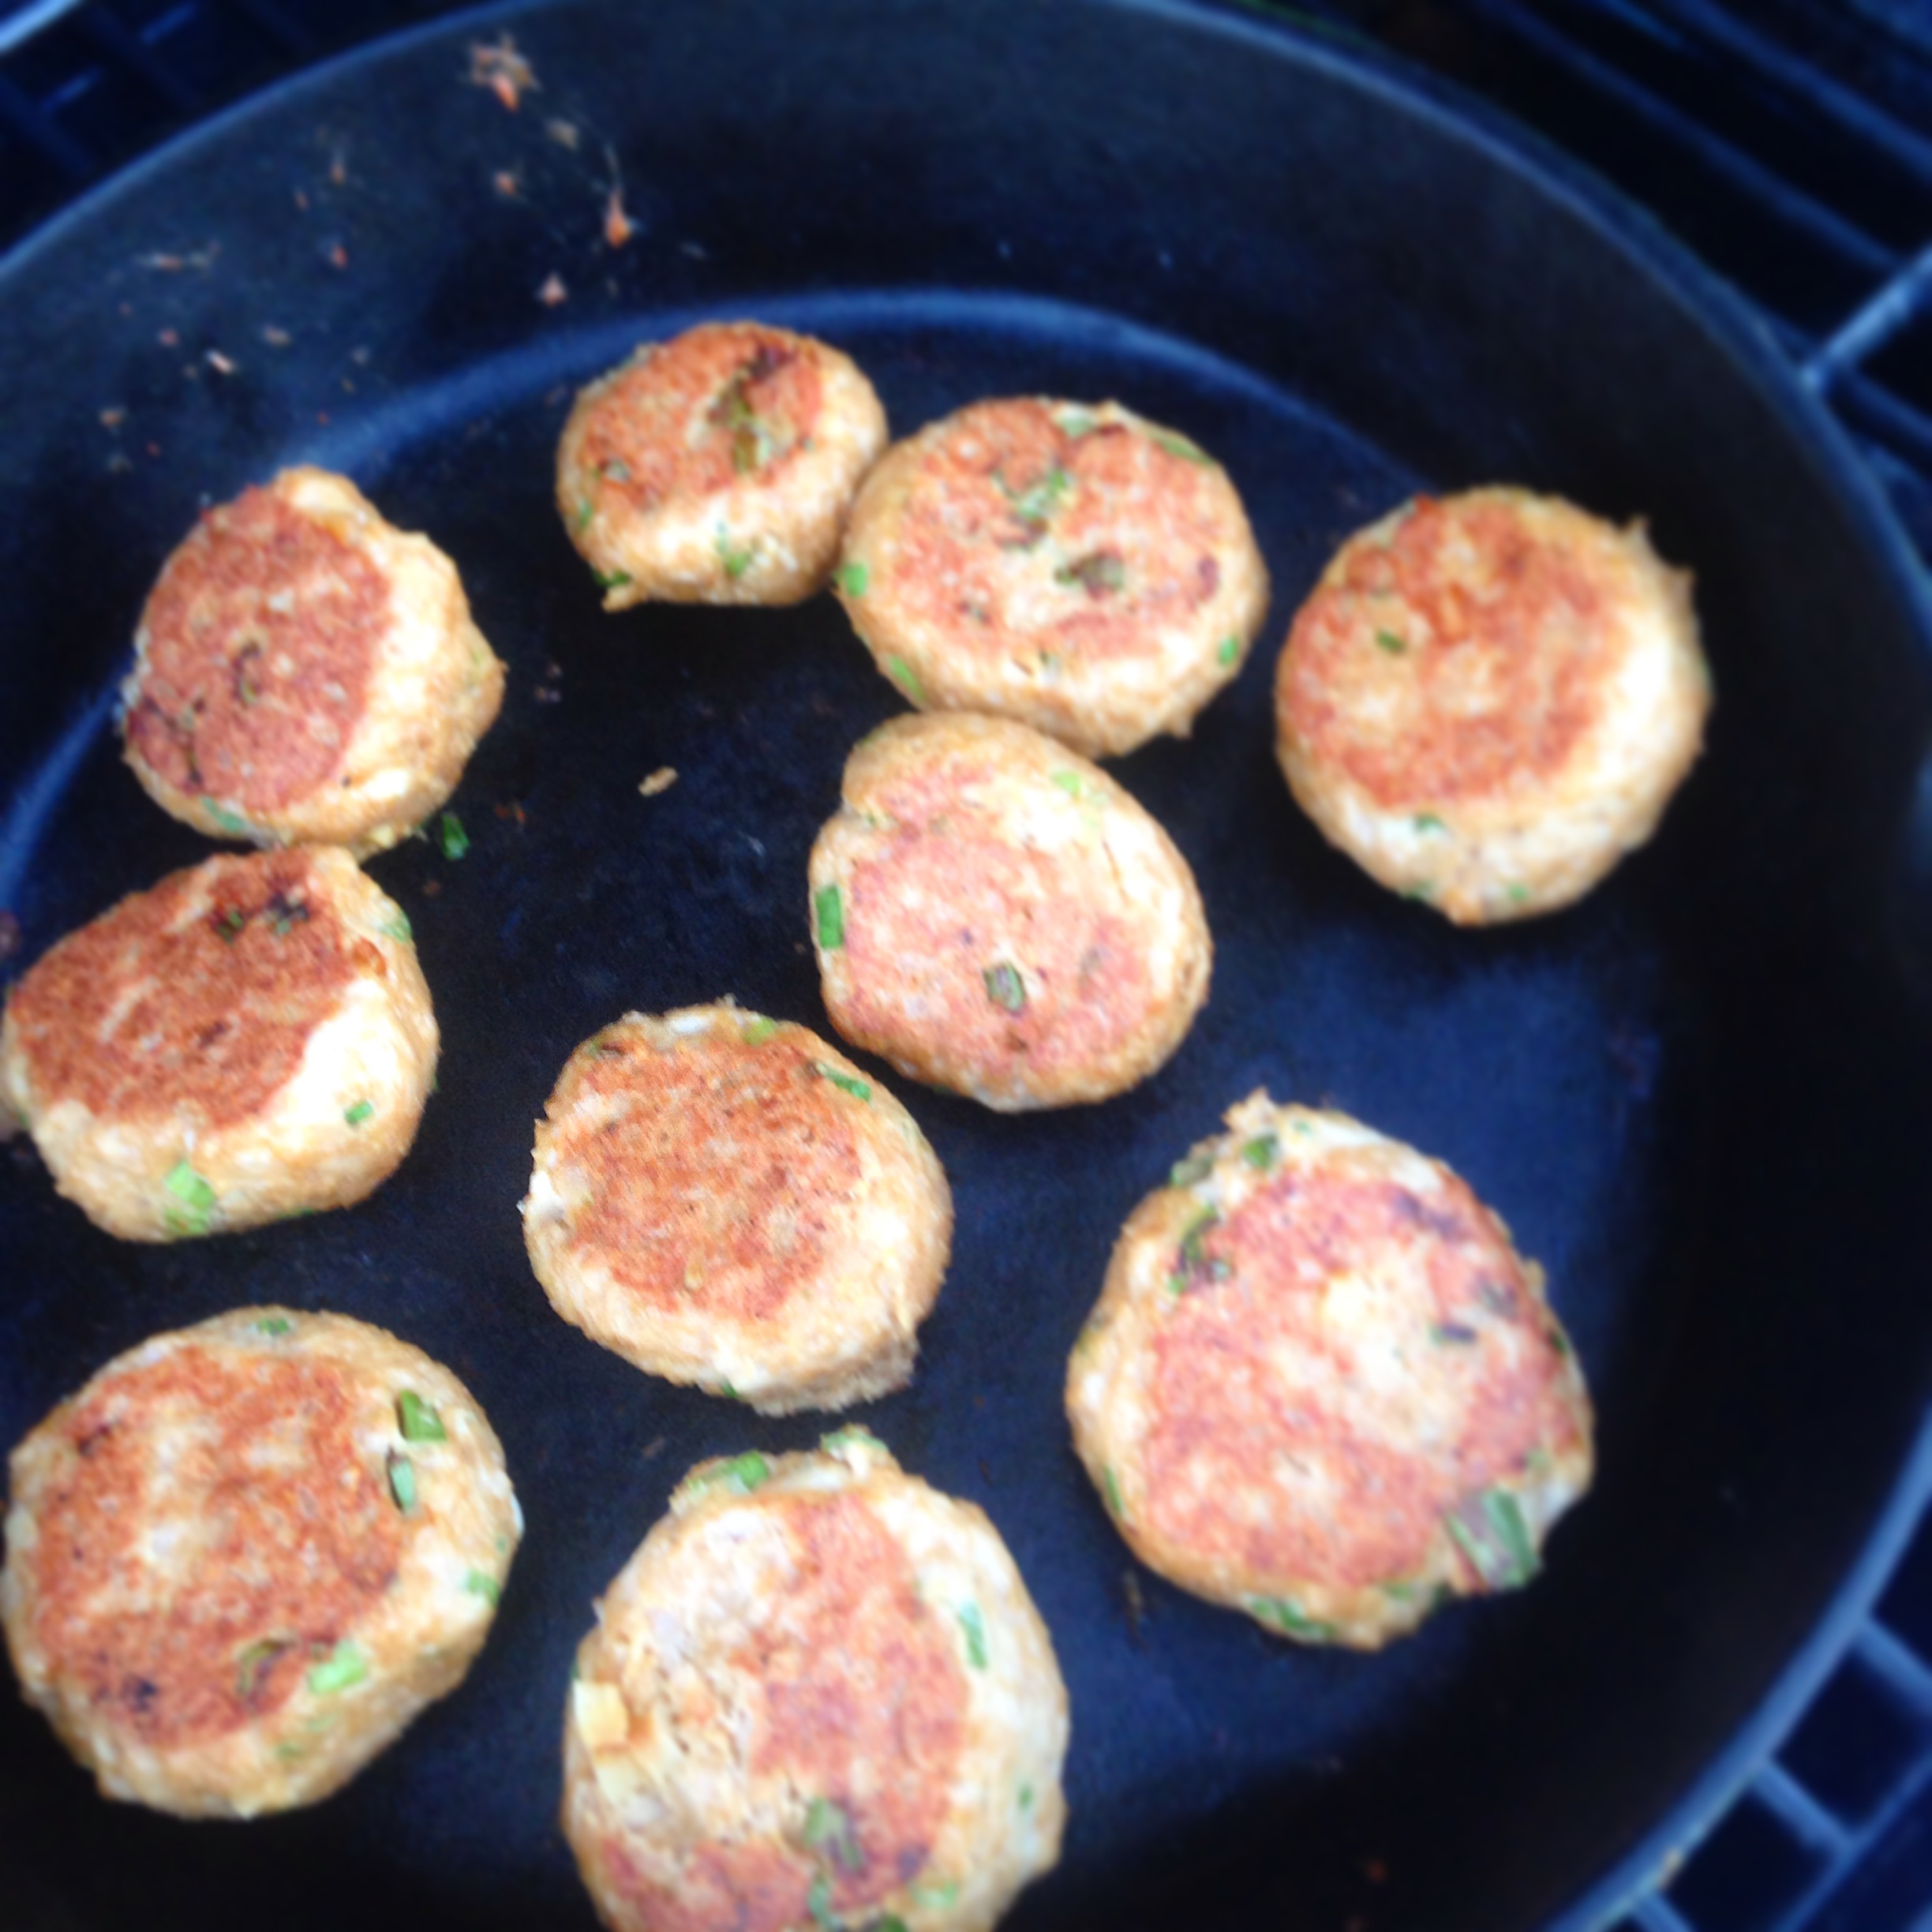
Find a baking sheet and start to make balls of the meat. Place the meatballs on the sheet with a little space between them. Pop in the oven for 10 minutes. Remove and use a flat spatula to peel them off of the pan without losing the crusty bits. Take some tongs and turn them over, back in the oven for another ten minutes. It was too hot for me to turn on an oven in my house. I used a cast iron skillet outside on my propane grill. The principle remains the same. I’ll keep my instructions to the oven for word counts sake.

Asian Chicken Meatballs Post, Flip

While in the oven, mix the Soy Sauce, Oil and Vinegar in a 3:1:1 ratio in a bowl. Add as much Sriracha as you want and toss in a spoonful of sugar. Taste. If the soy sauce is to powerful add more vinegar. If it’s too vinegary add oil. Once happy add the green onion.

Sacrifice one meatball to check for doneness. You want the center to be a little moist but cooked through. Look for the textural difference between cooked meat and raw.

Serve in butter lettuce leafs with sauce spooned over the top. Garnish with avocado and sesame seeds. I seasoned and spun some leftover brown rice into balls using plastic wrap for a little extra heft.

Advertisement
Tagged , , , , ,

Eggs Baked In Avocado

Eggs Baked in Avocado

Some beautiful genius deserves credit for this. If I had the time I would bravely sift through years of Instagram and peel back layers of Pinterest until just one picture remained.

Maybe what I’m searching for goes beyond the internet… I picture a dusty crawlspace with shoe boxes of family photos.  An elderly woman pushing out words loud enough to hear through the floor, “Florence used to do that I swear! The kids loved it!”

When that day comes I will give credit where credit is due. Until then, that hero will remain unnamed, safe in the knowledge that they made the world a better place.

Breakfast is easily the best meal. First of all there’s coffee, that’s awesome. That’s a blog post alone. Shoot, making the perfect cup of coffee is an entire industry. I’ll leave it be. For now.

Then, amongst the cacophony of choices, there is the humble chicken’s egg. It rises like the phoenix above all matters of parfaits and home made muesli bars. A perfectly prepared egg is easily the third most photographed thing on the internet. Check out #eggporn for a good time.

One of the things I love about this dish is that the potatoes are used to keep the avocados from tipping over during the cook. Practical engineering in the kitchen. I think. I’m not an engineer.

This all  leads us to a remarkably simple and elevated way to serve a pair of eggs. Perfect these and your lady friend might stick around for all of Sunday Funday.

Avocado Egg Ingredients

Serves 2 Takes 35 minutes

  • 4 chicken eggs
  • 2 large ripe Avocados
  • 2 medium sized red potatoes
  • 1 ripe tomato
  • hot sauce, preferably Tapatio or Cholula (or minced onion, or a dash of cheese, or all of the above)
  • Salt and Pepper

Preheat to 400f / 205c

Start by dicing your potatoes and tossing in olive oil, salt and pepper. Lay them in a single layer on a baking sheet and get them in the oven. Set a timer for 20 minutes.

Get to work on the avocado. Slice in half and remove the seed.

Using a spoon, scoop out enough avocado to fit the volume of the egg inside. Might be more than you think, at least two spoonfuls.

Scooped Avocado

Splash a pinch of salt and pepper on the avocado and wait out the timer on the potatoes.

Once those are half done, using a good potholder, take the sheet pan out of the oven and push the potatoes around so you can set the avocados on the sheet without them tipping and rolling around. Crack one egg into each half an avocado. Have a small bowl standing by in case you start to overflow and panic. Just pour the egg into the bowl and scoop a little more avo out.

Into the oven

Once the avocados are filled and propped up, dash some hot sauce on them and put them back in the oven. Set a timer for 15 minutes.

Slice up that tomato and drizzle with some olive oil and salt and pepper. Set that up with the excess avocado on your serving plates.

When the 15 minutes are up pull out the pan and take a look. The whites should be set and the yolks still soft. The air bubbles in the yolk cook translucent, don’t be fooled by the clear. I usually poke the white with a fork.

Finished!

Remove from oven, dash of salt and pepper on each. Serve with the fresh tomatoes and roasted potatoes.

Tagged , , , , ,

Chard and Chickpeas in Lemon Garlic Sauce

Chard and Chickpeas in Lemon Garlic Sauce

Inspiration struck at dinner the other night, my wife and I were celebrating her return from a trip to the east coast and opted for some pasta. She allows us a carb waiver from time to time and this particular night we really went after it, having bread and house made pasta at an excellent restaurant in Culver City, CA called Bucato. Their ever changing menu featured a dish that was essentially just chard and garbanzo beans with a lemon butter sauce. It’s simplicity was striking and richness of flavor impressive enough for me to tackle the concept at home, albeit with substantially less butter and salt I’m sure. Do not be intimidated by the use of the word “sauce”. It is merely a mix of liquids naturally present in the cook and heated until it reduces a bit. Nothing major here! This is a great way to take advantage of the flood of in season greens that is soon to be upon us. Try it! Substitute chard for spinach or kale if more handy. Add a splash of white wine to the sauce if you’d like, don’t forget to splash some in your glass too!

Chard and Chickpeas in a Lemon Garlic Sauce

This plus some broth is all it takes

This plus some broth is all it takes

4 Servings, 20-30 minutes

  • 8-10 full leafs of chard, rinsed and chopped down.
  • 1 large shallot (diced)
  • 2 cloves of garlic (chopped)
  • 2 cups of chicken or vegetable broth (1/2 of one of those standard sized boxes)
  • juice of 2 lemons
  • 1 can of garbanzo beans (rinsed)
  • 6-8 halved cherry or grape tomatoes (or one medium sized tomato chopped)
  • 1 handful of chopped walnuts

Rinse and dry your greens, chop them into chunks and put in a bowl. Set aside. Juice the two lemons and remove the seeds.

Take a large skillet, put it on medium and toast your walnuts. A few minutes on the heat, give them a stir and a shake, a few more minutes. Set aside and wipe out the pan with a wad of paper towels. (Careful, hot!)

Dice up your shallots, garlic and chop the tomato. Pour olive oil into the skillet and let heat up a few minutes on medium high. If you really want to get this to a restaurant type flavor profile use butter and olive oil. Butter is amazing. It’s also kind of bad for us. Olive oil only tonight. Add the shallots to the heat and let them bloom. Smells good… that’ll get your neighbors attention. Salt and pepper it.

make the neighbors jealous!

make the neighbors jealous!

Once they are starting to soften, add the garlic and tomatoes. Pour in a splash of the chicken stock and let it reach a boil. After a few minutes of this add the rinsed garbanzos and stir. Add more broth in batches, a little at a time. Give the beans 5 minutes on medium high heat and add the green chard. Pour in half the lemon juice, stir and cover. Taste as you go, have a spoon nearby dedicated to the purpose.

We're about halfway there

We’re about halfway there

The chard will reduce pretty quickly. After 5 minutes covered, stir it up, add more broth and keep the cover off.  At this point it’s almost come together. Add the rest of the lemon juice and pour in any remaining broth. Turn the heat up to high and let the water content steam off. The liquid will become a sauce right before your eyes. Add salt and pepper to taste, you want the liquid to be rich in the flavors of the lemon, garlic and chard.

Take off the heat. Serve over pasta, rice or chicken. Sprinkle the toasted walnuts over the mixture. We ate ours spooned over quinoa with sliced chicken breast on the side. A delicious and simple splash of seasonal gourmet… at home… in under a half an hour.

***Chickpeas? Garbanzo beans?? What’s the difference? (There is none!)***

Tagged , , , , , ,

Minestrone Soup in Under an Hour

Minestrone Soup

Oh Minestrone… How I love thee. It, like so many food memories, takes me back to childhood, to memories that are so old and faded that they’re best described by colors. A whiff of a maturing minestrone soup on the stovetop will transport me to a time when chairs were something I had to climb to sit on. It’s bright and savory, steeped in herbs and hearty with cannellini beans and pasta.

I spent a few days last week working with a fellow food lover. We spent hours talking about this spot and that, our favorite dishes and preparations. We swapped tips and techniques and sat down to two exceptional working lunches. At one point minestrone came up (he uses swiss chard, brilliant) and it got it stuck in my craw, the craving sat in the top of my stomach from the moment it was breached. By hour 40 I had broken. It had to be done.

Ingredients for Minestrone Minestrone Soup

Serves 6-8
45-60 minutes

Ingredients

  • 1 clove of garlic
  • 2 carrots
  • 1 celery stalk
  • 1 medium yellow onion
  • 1 small yellow summer squash
  • 1 small zucchini squash
  • 1 large can of crushed tomatoes
  • 1 can of cannellini beans
  • 6 cups of chicken/ vegetable broth
  • 2-4 cups of uncooked baby spinach
  • A handful of fresh green beans
  • 1/2 cup of a small pasta shells
  • A hard italian cheese… Parmesan, Romano… (or, if you’re feeling classy, Pecorino)
  • 1 Baguette

Dried herbs

  • Marjoram (oregano works too)
  • Thyme
  • Sage
  • Basil
  • 2 Bay Leaves
  • Sea salt
  • Cracked black pepper

Preparation

Get everything out and organized. Set up a slop bowl for peels and ends, it keeps you from running back and forth to the trash.

Splash some olive in a pot on medium, break down your onions, carrots and celery into small bits. Salt & pepper, 2 layers of thyme, 1 layer of marjoram(or oregano) and a dash or two of basil and sage.  Stir the mix and put the burner on medium high.

Get to work on those green beans. I’ve never really figured out a perfect method with beans. I just snap off the stalk end with my fingers and work my way through the pile. Snap, next. Snap, next… Then I try to bundle them all like matchsticks and cut them into 1 inch pieces.

Slice the garlic, toss it in.

Quarter your zucchini and summer squash and chop it down. Into the pot it goes. More salt and pepper. Stir.
Add the tomato. Rinse the beans good if they’re out of a can and put them in. Salt, pepper, another coating of herbs. Bay leaves. Stir.

Note the order I did that in. Onions first, almost always. Everything else goes in order of vegetable firmness. Garlic usually in the middle, you don’t want it to burn and get bitter.

Mama Mia!

Mama Mia!

Give this a few minutes. Absentminded? OCD? Set a timer for 4 minutes and twenty three seconds.

Pour in your 6 cups of broth and stir. Turn heat to high and cover.

Do you have any old Parmesan rinds kicking around? Got a great tip this week, save your rinds in the freezer. Pull them out for jobs like this. I happen to have one in the fridge. Toss that in the soup.

Bring to a boil. This is where I clean up my mess. A clean kitchen is a happy cook! Working quickly I had enough time to clean up all the dishes I had just used and wipe down the counters.

Once the soup is boiling give it another stir and turn the heat down to medium high. At this point you can do it a few different ways. If it’s the weekend and you feel like torturing your friends and family, turn down the heat and take your time. Let the smell whip the guests into a frenzy. (A trick I learned from my mother) They’ll be knocking each other over by the time you’re ready to serve. If you’re in a hurry like me, keep whipping that soup into a boil. Ze flavors must marinate! Ze broth must reduce! Work soup work! 

A boiling soup is a reducing and thickening broth. You need some of that to concentrate the flavors but you don’t want it too thick. I like my soups with a lot of broth so I keep the cover on for most of the cook, pulling the lid off at the end for a mad dash 5 minute reduction. It’s a balance. You can always thicken more with uncovered heat. Thinning the broth is a little more complex and I try to avoid it.

Boil some water for your pasta and get that going. Follow the instructions on the box for timing. Drain the water and set your pasta aside.

Why do this? Extra steps and extra dishes? Not usually our style here in the mancookgood kitchen.

I do it because I don’t want to leave the pasta in the soup for leftovers. Same goes with rice. It continues to absorb the liquid and by day two or three my beautiful broth is a solid block of bloated pasta. It’s like a parasite sent to drink up all that goodness. Like Uncle Jack, it never stops drinking.Not today Mr. Cavatelli. Not today.

By this point your soup should be beginning it’s descent into flavorland. Drinking a glass of wine? Red? I was. Splash some in at any point.

Slice your bread and get it ready. (Toasted? I did) I like to put it in the toaster oven pre buttered. It makes for a soft interior and crispy edges. Who doesn’t like crispy edges? Bring them to me.

Add the spinach. Yes, all of it. It reduces, trust me. Stir it in as it shrinks.

Taste the soup. It should almost be there. Check the carrots, make sure they’re soft. Turn up the heat and take off the lid. Please put your tray tables up and in an upright position, the pilot has turned on the fasten seat belt sign. 5 more minutes of an uncovered boil, taste it again. Hot!

Here’s the most important part.

Spoon the soup and some cooked pasta into a bowl and grate your cheese over it. This is nearly non negotiable. Lactose intolerant? How bad? Grate the cheese and take a pill or something.

Sprinkle some chili flakes and a spot of pesto if you have it hanging around. Serve with the bread and a smile. Make the soup. Win the day.

Tagged , , ,

Grilled Carne Asada


IMG_1279My mother is an exceptional cook. She grew up in a time and a city where families of European immigrants lived clustered together in neighborhoods named after their homelands. It became my stomach’s good fortune that “French Hill” happened to border “Italian Hill”. While the children were off to school and the men off to work, generations of women would cook their family recipes throughout the day in anticipation of their families return. It was the smells of the neighborhood that got my mother most hooked on food. She spent days with other peoples’ grandmothers learning the foods they had learned from generations past.

I didn’t spend much time in the kitchen with my mother growing up, I was too busy taking the fresh and delicious food we ate for granted to do that. It wasn’t until I had grown and moved out that my enthusiasm for food began to take shape. I did, however, learn through osmosis what amounts to a master class in food and family theory that continues to this day. Her excitement about other culture’s foods really stuck with me. I can’t eat or smell something for long without dissecting the flavors and learning to make some version of it. Like many staples in my family’s home, my inspiration for yesterday’s meal began in my neighbor’s kitchen. One whiff of their grill on my way out the door and I knew Mexican would be on the menu. While I won’t pretend to know an Abuela’s version of carne asada I’d like to think she’d enjoy it if she had some. You’re always welcome Abuela!

I’m almost to the point.

So yesterday we had the conference championship games for American football. These days have become informal holidays in the States, the bigger the game, the bigger the group. Friends and casual fans come out of the woodwork while we light our fires, cook our meats and yell at men dressed in stripes. Depending on your rooting interests, they can be the best and the worst days but there is always food to keep us busy.

Yesterday while the Green Bay Packers cruelly teased their fans with early dominance, I was buzzing around a friend’s kitchen preparing some Carne Asada.

What’s that? Don’t live 100 miles from the Mexican border?

Carne Asada is seasoned flap meat, cooked nearly well done and usually served in tacos or burritos. It is best grilled. Serve it with your favorite Mexican condiments. I prepared fresh salsa, chopped avocado and a cheese called queso fresco. Sour cream, shredded cheese and jarred salsa would do just fine. Tortillas too, of course. I now owe you a post on salsas and condiments. Soon. For today we’ll focus on the meat.

Ah yes, the meat. But what is flap meat? So many questions. Flap meat is a cut found in the bottom sirloin. It’s cheap, well marbled (fatty) and very thin. Buy it in hispanic grocers by the pound. The French call it “bavette”, some South Americans call it “vacio”. I call it delicious.  If you can’t find it, use skirt steak or anything you can find that is thin and flat.

Serves 6-8. Takes between 30-60 minutes.

  • 3 pounds flap meat
  • 10 limes
  • Your favorite chili powder (I used a ground New Mexico Chile with medium heat)
  • kosher or sea salt
  • oil

See? Easy as pie. Not that pie is easy. Especially if you’re preparing your own crust.

sprinkle sprinkle

sprinkle sprinkle

Flap meat is often sold in a bag. Keep it in there for a moment and splash some olive oil on it, enough to cover most of the meat with a light layer. Shake it up, then lay it out flat on a platter or a sheet pan if available. I used foil to keep the amount of dishes down. Sprinkle a layer of salt on both sides of the meat and a layer of chili powder on one side. Repeat this on all the steaks.

Set aside. 5 minutes? Half hour? Overnight? Your call. The salt tenderizes the meat while making it delicious so you do have some incentive to wait. If you’re in a hurry, say you want to stop cooking and watch football, rush this part. No biggie.

burn fire burn

burn fire burn

Get your fires hot. Medium high / high on a gas grill, if you’re using charcoal you’re obviously not in a hurry. Get a nice pile of coals going and have a beer. Enjoy your task. Just before you put the steaks on the grill dress with lime juice. Give them a minute. Place the steaks on the grill, add more lime juice and let them cook. You do not want your flap meat cooked to medium rare. You need to cook it so the fat and proteins start to break down. Char that side, flip, add more lime juice.

Chop up your limes into quarters and halves and heat some tortillas wrapped in foil on a less hot part of the grill. It helps to flip the tortillas like pages in a book before you heat them. You don’t want them to heat up and fuse together.

When the steaks are well done and have some burnt edges, pull them off the grill and dice them up good.

Serve with tortillas and bowls of Mexican condiments. Grab a plate. Go sit down and watch the game.

Pay no attention to the carnitas on the right

Pay no attention to the carnitas on the right

Tagged , , , , ,

Swiss Chard with Lentils and Toasted Almonds

I remember the day my wife (then girlfriend) told me she wanted to stop eating meat.

I was devastated.

She was never much of a meat eater but always ate what I cooked. In those days my food was pretty standard fare. Meat. Vegetable. Starch. The occasional meatless dish usually featured pasta, and even then hopefully a sausage link or meatball or two on the side.

So I mourned. Not only for the ease of ordering and restaurant selection but for the style of cooking I had begun to develop. What would I cook? Did I now have to make two versions of everything? What about the meeeeattttt?

Now years later I (again) have my wife to thank for another transformation. These days I cook meatless more than not. I’m not talking about tofu flavored sprouts or factory made “chik’n”. I hate that stuff. I’m talking about hearty, delicious entrees that fill you up and don’t leave you lacking.

When cooking vegetarian the key is to work protein in as much as possible. This dish, with lentils, swiss chard, almonds and feta is loaded with protein and vitamins. The use of oregano, sage and fennel seeds give the lentils a very meaty flavor. Don’t feel up to a vegetarian dish tonight? Brown some sausage and add it to the mixture at the end.

Super foods unite!

Super foods unite!

  • 1 Head of Swiss Chard
  • 1 cup of dry lentils
  • 4 cups (one large box) of vegetable stock
  • 2-3 stalks of celery
  • 2-3 carrots
  • 1 onion
  • A half of a lemon’s worth of juice
  • 2 cloves of garlic
  • a handful or two of almonds
  • feta cheese
  • Powdered sage
  • Fennel Seeds
  • Oregano (or Marjoram)
  • Bay leaf
  • Olive Oil
  • Salt
  • Pepper

Start by chopping up your veggies. Dice them up pretty small, especially the carrots. Heat up some olive oil on medium high and get those onions in the pot. Salt, pepper, a layer of sage, oregano and  two dashes of fennel seeds. Add the celery and carrots.  Shake out another layer of sage and oregano. Toss in the chopped garlic. Stir.

Smells good!

Once that has all started to work together pour your vegetable broth over the whole thing, dump in your lentils and cover. Add a bay leaf and turn the heat to medium.

Now for the swiss chard. This is a pretty robust leaf. If you bought it from a farmers market or in a bunch like me it’s quite the handful. I filled up the clean sink with cold water and broke the chard down by hand into more manageable pieces. Remove the really big stalks with scissors or a knife and work your way through it all, stopping occasionally to stir your lentils. You want them on a light boil and the cover on so you don’t reduce the liquid too much.

Run your swiss chard through a lettuce spinner. If you don’t have a lettuce spinner you’re in for some work. You should buy one anyway. Next time. Shake the leaves out by hand, press them with dish towels and accept that they’re going to have some moisture on them. No big deal.

At this point I would take the cover off of your lentils and let the liquid reduce down to about half of its original volume. Add the chard in batches, filling the pot, covering it, stirring it, covering it, repeat. You may think it can’t handle more but don’t worry it will reduce considerably. Add some more herbs. Salt and pepper again. Once you get the chard in stir occasionally while letting it cook.

Load it up!

Load it up!

Chop up some almonds and toss them in a small skillet on medium low heat. Let the almonds toast up with an occasional stir.

Taste the lentils. Too firm? More time. Liquid reduced too fast? Add some water. Watery? More heat, less cover, more spices. The lentils and chard are done when there is enough liquid left to be a sauce but not quite a broth. Add the lemon juice, give it a good stir and turn off the heat. Give it 5-10 minutes to cool down a bit and let the flavors calm down and mix together.

Scoop on its own or over a grain. Add the almonds and some feta cheese at the end.

Eat!

Tagged , , ,

Homemade Tortilla Chips

Home Made Corn Tortilla Chips

The first time I had an authentic Mexican taco I’ll admit I was a little skeptical. I had recently transplanted from Massachusetts to Southern California and until that moment I had only eaten tacos sitting down, in crunchy shells and loaded with cheese. Massachusetts has a lot of great food, but Mexican cuisine is not it’s strong suit.

I stood in a line of Mexican men at a truck in a parking lot in Bakersfield, CA, using my fractured high school Spanish to navigate the menu while my friend Renee tried her hardest to convince me that these were “real tacos” and that eating from a truck in a parking lot wasn’t going to make me sick. This was 2002 mind you. Gourmet food trucks were nearly a decade from being fashionable.


So I ordered an A-Sa-da taco for $1. I looked at this mini disk of corn tortilla with steak, onion, cilantro and salsa on it and furrowed my brow a little. I took a bite.


I ordered 3 more when I was finished. By the end of the week I had returned to the truck twice more.

So yea. Mexican food is my buddy now. I eat it constantly in the spring and summer.

Here’s my take on healthy tortilla chips. A simple snack that tastes great and isn’t loaded with calories and fried oil.


  • Buy Corn Tortillas
  • Cut them into triangles.

Corn Tortilla Chips Prepped

  • Toss them in oil, sea salt and lime juice. 
  • Toast in the toaster oven. You can broil them or bake on high heat in a conventional oven too.

Homemade chips in the oven

  • Keep an eye (nose) on them, they turn quick. Maybe 3-5 minutes depending on temperature.
  • Homemade chips.

Yum

Tagged ,

Turkey Barley Soup

Day 5.

It’s been 4 days since the Thanksgiving feast. Our cravings for holiday fare have subsided a bit. Once bountiful supplies have dwindled and a storm has blown over the Los Angeles Basin. It’s cold, dark and wet outside. We are running our artificial lights during daylight hours. The doors and windows are shut tight, the heat has been turned on. Even the ceiling fans have been silenced. It will be days until we see 70 degrees again. These are truly the dark days of winter here in Southern California. I am left with no choice. I must make a soup to nourish my friends and family and boost morale. We will find comfort in homemade stock and thyme and rosemary. We will find inspiration in the turkey who sacrificed himself for this noble task. We will carry on.

Smells like health

Smells like freedom.

Turkey Barley Soup.

Hopefully you took the stripped down turkey carcass and boiled it in water for 2 hours last Thursday. Tell me you did. (It’s ok if you didn’t, just a missed opportunity on both of our parts) For now, let’s assume you did.

That means you have about a gallon of liquid gold, err turkey stock. That’s a good start.

So check your kitchen or head to the store. For this you’ll need:

90 minutes (The barley takes over an hour to cook. Rice or quinoa would take half that)

Leftover Turkey (a couple handfuls will do)

2-4 celery stalks

2-4 carrots

1 onion (or a leek, or 2-3 shallots)

a cup of uncooked barley (rice, quinoa, pasta too)

8 cups homemade turkey stock (or store bought chicken / vegetable broth)

1/2 of a lemon

2 cloves of garlic

Thyme

Rosemary

Sage

Salt 

Pepper

Olive Oil

Chop the leek into thin strips and toss it into hot olive oil. Salt and pepper it. Chop up the garlic and toss add that too.

soon

soon

Break down the carrots and celery into small uniform pieces. Big chunks work too, it just cooks faster and is easier to eat in smaller pieces. Put that all in with the onions, stir and add salt and pepper.

Give that a few minutes. Use that time to clean, organize and get your herbs out. I had a lot of fresh ones leftover from Thanksgiving so they needed to be broken down and chopped. Lots of thyme (if dry, cover the surface of the liquid in 2 layers, if fresh, use a loose handful), half as much rosemary, half of that in sage. It really it doesn’t matter much and is to your personal preference. We’re making soup. Add more as you go. It’ll be delicious.

Pour in the broth and add the herbs. Salt and pepper again. Add the turkey and barley and set on medium high heat with the cover on.

This is when I clean up the kitchen. (again) I like it tidy when I cook. It keeps things moving smoothly. By the time you’ve wiped down the counters and washed up your prep dishes the soup should be boiling. Give it 45 minutes with an occasional stir. By then things should be pretty close to done. Take the lid off and keep it on medium high for another 30 minutes. At this point you should be checking in every ten minutes or so. Have a taste. (HOT!) Does it taste like soup yet? If not give it more time. The color, smell and taste of the soup will shift when it’s done. I’m sure there is a scientific reason for it but I like to think that the separate ingredients finally yield to each other and collapse into a group hug. If you’re watching the broth you’ll be able to tell.

Right at the end I turn off the heat entirely and squeeze the half of a lemon into the whole mixture. This lets the flavors settle in and the soup cool enough for people to eat. I took a fresh baguette smeared with olive oil and broiled it in the oven for a few minute. The soup was served in mugs. Six people ate, several had seconds. Nothing was left behind.

Instagram @mancookgood

Twitter @mancookgood

Tagged , , , , ,

How to make Chicken Pot Pie in under an hour

Should serve 4. Might serve 2.

Should serve 4-6. Might serve 2.

Oh my it’s mid November already. Where. Has. The. Year. Gone.

Anyways, when the days get short and the air gets that nip in it my cravings take a sharp left turn away from the grill and salad for dinner and smack dab into a pit of gravy.

Mmmm… Gravy.

Well the other day I found myself scanning the mancookgood Instagram feed and drooling over a yorkshire pudding posted by @sharonskitchenx of humbletartkitchen.com. Trouble is I’m not even sure what Yorkshire pudding tastes like and I had at least ten more hours of work in front of me. Nonetheless a seed had been planted and something had to be done.

Chicken Pot Pie floated to the surface and I spent the rest of the day considering ways I could stop at the store on the way home, crank out a pie and eat at halftime without missing too much of the game. My quest for football season food never ends. The trick is finding something delicious I can make without slaving over the fires and missing half the action.

Genius struck around 3pm and I was left without a choice.

Ingredients

  • 1 whole roasted chicken
  • 2 carrots
  • 2 sticks of celery
  • 1 leek
  • 1 shallot
  • 1 medium russet potato
  • 1 lemon
  • 1 can of chicken stock
  • 1 sheet of puff pastry
  • 1 handful of white flour
  • thyme
  • rosemary
  • 2 bay leafs
  • salt
  • pepper
  • oil

Put the oven on 375f / 190c. Take out a sheet of puff pastry and lay it out flat to thaw.

Pot Pie Prep

Nice and tidy

Chop the leek, shallot, celery, potato and carrots into small chunks. Toss it into a large skillet with olive oil on medium high. Salt and pepper.

Next break done the bird. Slice of the wings first, eat one and hand the other to your friend. Do the same with the drum sticks.

Then get into the breasts, thighs and back meat. Separate from the bird and remove the skin. Eat that or set it aside. Chop all the meat into bite size pieces. At this point the onions should be pretty soft.

Add the chicken to the mixture, salt, pepper, lots of thyme, half as much rosemary and two bay leafs. (we’re in a hurry, need that extra punch of spice)  Now add the chicken stock and turn the burner to high to get a boil going.

Smells like Thanksgiving

Smells like Thanksgiving

While you let the mixture reduce slice the skin off of a lemon and cube it. Throw that in there. A little brightness in an otherwise savory dish.

You can work the puff pastry a little here and roll it thinner. I left it as is. (the game was on!)

Let the liquid reduce by about half, sprinkle in a little flour a few times until the juice is almost as thick as gravy. This is to your preference, it’ll be delicious no matter what at this point.

Pour the filling into a greased pie pan. Drape the pastry over the pan and seal it around the edges. Poke a hole in the top and put in the oven.

I had a little pastry left over from the corners so I made some little chicken skin turnovers too.

Cook some of the fat off the skin in the now empty skillet, wrap it in pastry. Put it in the oven on some greased foil while the pie cooks.

Set the time for 30 minutes and go watch the game. Keep an eye on the pie for the another ten minutes until it’s the crust has browned nicely.

Eat. Watch game. Have seconds. Yum.

Tagged , ,

How to Butterfly a Chicken

Butterflying a chicken is a simple and useful technique that I use to grill or sauté an entire bird. Butterflying meat is to split the meat almost entirely apart and spread it flat. This allows very thick proteins to cook faster and more evenly in certain cooking conditions.

Images ahead, vegetarians beware!

The first thing you want to do is lay the bird on its front with the body cavity facing away from you. The back will be right side up. It has a lot less meat than the breasts and the drumsticks will be tucked under the thighs.

IMG_0358.JPG

The second step is to take a pair of kitchen shears and start to cut along the spine. Finish the other side and pull the back bone out.

IMG_0357.JPG

A little gruesome. The next step too. Take the bird by the thighs and bend the it away from the center until you hear some bones crack and you’re able to lay it flat.

Salt, pepper and you’re ready for the cook!

IMG_0356.JPG

Remember poultry safety! Wash your hands or wear gloves and keep the raw chicken off of surfaces that will have other food on it! Salmonella is a cruel mistress!

Tagged , ,
%d bloggers like this: